Bernina 125 Manual - Page 25
Sewing, Buttons, Applique, Works
 |
View all Bernina 125 manuals
Add to My Manuals
Save this manual to your list of manuals |
Page 25 highlights
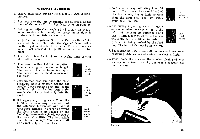
Fig. 37 The Sewing on Buttons I. Turn button 5 at the back of the arm (Fig. 7) so that the needle will stitch in the left side of the stitch hole. 2. Lower feed dog by turning knob 28 (Fig. 22) to the left until darning sign appears. 3. Insert button presser foot (2 black stripes) and place the button under it, as shown in the above picture. 4. Adjust the width of the zigzag stitch according to the distance between the holes in the button and sew it on by six to eight stitches. 5. To fasten the stitches, let the needle in the hole of the button, raise the presser foot, put on zero the zigzag adjusting knob 31 (Fig. 22), lower the presser foot and make some fastening stitches. In case of four hole buttons, displace the fabric and oversew the remaining two holes by another six to eight stitches. 46 Fig. 38 Fig. 3$ a Applique Works (Use left position of needle) By sewing on scraps of cloth or tulle of different colour, a very nice decorative effect will be obtained. For such kind of work use preferably the buttonhole presser foot, marked with 3 black stripes. First apply the design on the wrong side of the cloth. Cut out the scrap a little larger than the design, put it on the right side of the cloth and fix it with provisional stitches. Then, on the wrong side of the cloth sew along the contours of the design with a narrow (width 1 or 11/2), not too short zigzag stitch. Use a thread of the same colour as that of the scrap to be sewn on. Then, remove the provisional stitches and cut the superfluous part of the scrap along the zigzag seam. To finish the applique works, sew another zigzag seam over the first one, a little wider (width 2112) and shorter, but this time on the right side of the cloth. 47
-
 1
1 -
2
-
3
-
4
-
5
-
6
-
7
-
8
-
9
-
10
-
11
-
12
-
13
-
14
-
15
-
16
-
17
-
18
-
19
-
 20
20 -
 21
21 -
 22
22 -
 23
23 -
 24
24 -
 25
25 -
 26
26 -
 27
27 -
 28
28 -
 29
29 -
 30
30
 |
 |
