Bernina 125 Manual - Page 27
Useful, Suggestions, little, troubles
 |
View all Bernina 125 manuals
Add to My Manuals
Save this manual to your list of manuals |
Page 27 highlights
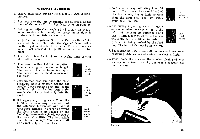
The Ruiner Fig. 40 Of two pieces of material, place under the ruffler the piece that is to be ruffled and lower the presser foot lever. Now insert the top material, which is to remain smooth, into the slot of the ruffler. The more the smooth top piece is held back during sewing, the larger and closer are the ruffles on the lower material. If a single piece of material is to be ruffled, place it under the ruffler (not in the slot of it). The ruffles will vary according to the length of stitch used. Ruffles can also be made as follows : Charge the bobbin with thick thread (30.16). Loosen the top thread tension and sew with a long stitch. This incorrect tension will result in the formation of ruffles, which can be slid along the strong bottom thread as desired. Then, with plain stitch, sew the ruffles on the fabric, using a normal top and bottom thread tension and a normal thread size. For this latter method of making ruffles, the usual presser foot may be used. (The ruffier is excluded from the normal accessories.) 50 Useful Suggestions in case of little troubles The Shuttle is blocked If the machine 5:2) should no more run forward and back- ward or if an un- a usual noice is noticed, then thread has got jammed into the shuttle race owing to wrong manipula- tion. In such a case the opening and cleaning of the 0?) shuttle race is very easy. Bring needle -elle bar to its highest point, press with Fig. 41 thumb of the left hand upon the flat spring 50 ( Fig. 41), so that locking bridge 51 and shuttle race cover 52 can be turned down. Then remove bobbin case and shuttle and it is now easy to clean the shuttle race from jammed thread remnants and dust with the small brush. Never use hard tools, such as scissors, screwdrivers, etc., otherwise the shuttle race might get damaged. After cleaning, first insert the shuttle, then lock the bridge 51 together with shuttle race cover 52 and insert the bob- bin case. Make sure that locking bridge 51 snapped well in flat spring 50. 51
-
 1
1 -
2
-
3
-
4
-
5
-
6
-
7
-
8
-
9
-
10
-
11
-
12
-
13
-
14
-
15
-
16
-
17
-
18
-
19
-
20
-
21
-
 22
22 -
 23
23 -
 24
24 -
 25
25 -
 26
26 -
 27
27 -
 28
28 -
 29
29 -
 30
30
 |
 |
