Biostar IDEQ N1 MANUAL - Page 59
Completing, Installation
 |
View all Biostar IDEQ N1 manuals
Add to My Manuals
Save this manual to your list of manuals |
Page 59 highlights
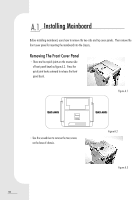
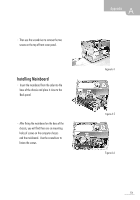
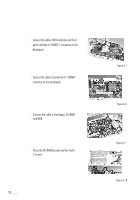
A Appendix Place HDD bracket. Fix it with one screw. -own Figure A.11 De' .0111 Figure A.12 Completing The Installation Place the front panel back and fix it with four screws to complete the installation of mainboard. at, t Figure A.13 Note: The figures show the locations of connectors on P4SBA mainboard. Please refer to section 2 -- the mainboard layout of P4ABS for the correct locations of the connectors. 53
-
 1
1 -
2
-
3
-
4
-
5
-
6
-
7
-
8
-
9
-
10
-
11
-
12
-
13
-
14
-
15
-
16
-
17
-
18
-
19
-
20
-
21
-
22
-
23
-
24
-
25
-
26
-
27
-
28
-
29
-
30
-
31
-
32
-
33
-
34
-
35
-
36
-
37
-
38
-
39
-
40
-
41
-
42
-
43
-
44
-
45
-
46
-
47
-
48
-
49
-
50
-
51
-
52
-
53
-
 54
54 -
 55
55 -
 56
56 -
 57
57 -
 58
58 -
 59
59
 |
 |

Appendix
A
Place
HDD
bracket.
—own
Figure
A.11
Fix
it
with
one
screw.
De'
.0111
Figure
A.12
Completing
The
Installation
Place
the
front
panel
back
and
fix
it
with
four
screws
to
complete
the
installation
of
mainboard.
at,
t
Figure
A.13
Note:
The
figures
show
the
locations
of
connectors
on
P4SBA
mainboard.
Please
refer
to
section
2
--
the
mainboard
layout
of
P4ABS
for
the
correct
locations
of
the
connectors.
53