Bissell CrossWave Cordless Multi-Surface Wet Dry Vac 2551 User Guide - Page 11
Emptying the Dirty Water Tank cont.
 |
View all Bissell CrossWave Cordless Multi-Surface Wet Dry Vac 2551 manuals
Add to My Manuals
Save this manual to your list of manuals |
Page 11 highlights
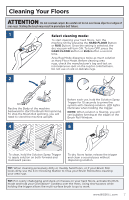
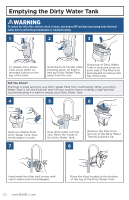
Emptying the Dirty Water Tank (cont.) WARNING To reduce the risk of fire, electric shock or injury, turn power OFF and disconnect plug from electrical outlet before performing maintenance or troubleshooting. 9 10 11 If the inside area where the Dirty Water Tank sits is dirty, wipe it clean with a rag or towel. Leave parts out to dry before reassembling. Place filter assembly back into the top of the Dirty Water Tank. NOTE: Make sure to clean your Dirty Water Tank and let all components dry out after each use to keep your product at its best. 12 13 14 Place strainer back into Dirty Water Tank. Once parts are dry, reassemble and replace the top of Dirty Water Tank. Angle the Dirty Water Tank back into body of machine inserting bottom first. Then tilt the top of the tank toward the machine and push into place until you hear a "click". www.BISSELL.com 11
-
 1
1 -
2
-
3
-
4
-
5
-
 6
6 -
 7
7 -
 8
8 -
 9
9 -
 10
10 -
 11
11 -
 12
12 -
 13
13 -
 14
14 -
 15
15 -
 16
16
 |
 |
