Bissell Powerlifter Pet Rewind Vacuum 1792 User Guide - Page 8
Maintenance: Post-Motor Filter, Maintenance: Pre-Motor Filter
 |
View all Bissell Powerlifter Pet Rewind Vacuum 1792 manuals
Add to My Manuals
Save this manual to your list of manuals |
Page 8 highlights
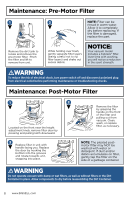
Maintenance: Pre-Motor Filter 1 2 NOTE: Filter can be rinsed in warm water. Allow it to completely dry before replacing. If the filter is damaged, replace the part. Remove the dirt tank to locate and remove the pre-motor filter. Pinch the filter and lift to remove from unit. While holding over trash, gently separate filter layers (being careful not to rip filter layers) and shake out excess debris. NOTICE: Your vacuum model includes a Febreze® filter. Over time with washing, you will notice a reduction in the scent strength. WARNING To reduce the risk of electrical shock, turn power switch off and disconnect polarized plug from electrical outlet before performing maintenance or troubleshooting checks. Maintenance: Post-Motor Filter 1 2 Located on the front near the height adjustment knob, remove filter door by pressing and pulling latch downward. 3 Replace filter in unit with handle facing you. Replace the door by hooking the bottom into the grooves and rotate towards unit, snapping into place. Remove the filter by grasping the handle on the front of the filter and pulling out from vacuum. Clean, wash, or replace filter, as necessary. NOTE: The pleated postmotor filter may NOT be washed with water or detergent. If dust and/or debris accumulates on filter, gently tap the filter on the side of a garbage container. WARNING Do not operate vacuum with damp or wet filters, as well as without filters or the Dirt Container in place. Allow components to dry before reassembling the Dirt Container. 8 www.BISSELL.com
-
 1
1 -
2
-
 3
3 -
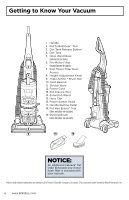 4
4 -
 5
5 -
 6
6 -
 7
7 -
 8
8 -
 9
9 -
 10
10 -
 11
11 -
 12
12 -
 13
13 -
14
-
15
-
16
-
17
-
18
-
19
-
20
-
21
-
22
-
23
-
24
 |
 |
