Bissell Total Floors Pet User Guide - Page 11
Cleaning the dirt container continued, Cleaning the pre-motor filter, & replacing the post-motor - febreze filter
 |
View all Bissell Total Floors Pet manuals
Add to My Manuals
Save this manual to your list of manuals |
Page 11 highlights
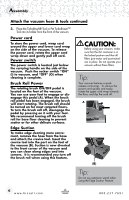
Maintenance and Care Cleaning the dirt container continued 5. If desired, the lower dirt cup may be washed in warm water. Make sure it is completely dry before reassembling. NOTE: Do not put in the dishwasher. NOTE: Use of moist parts/components in your unit will damage the motor and void your warranty NOTICE: Select models feature a Febreze® post-motor filter. For purchasing information, turn to page 17. 6. To reassemble, replace the inner cyclone screen by sliding it into the upper tank and rotating it to the left until the locking tabs stop the rotation. Cleaning the pre-motor filter & replacing the post-motor Filter. 1. Unplug the vacuum from electrical outlet. 2. 2. The pre-motor filter protects the motor from dirt particles. It is located in the slide out tray underneath the dirt container. If the filter becomes dirty, pull out the tray, lift out the foam filter pad and clean it. foam filter NOTE: The pre-motor filter may be hand washed in water with mild detergent. Rinse well and air dry thoroughly before replacing. NOTE: Use of moist parts/components in your unit will damage the motor and void your warranty 3. The post-motor filter assists in the filtration process to return clean air to the room. It is located behind the door on the side of the vacuum. If the filter becomes dirty, open the door, remove the filter and replace. 4. The Febreze® filter (select models only) is designed to eliminate odors during the regular life of the filter. Depending on usage, the post-motor filter should be changed every 3-6 months. Warning: Do not operate vacuum with damp or wet filters, or without all filters in place. 3. NOTE: The post-motor filter is a white, pleated filter. This filter is not washable and must be replaced when it becomes dirty. w w w. b i s s e l l . c o m 11 800.237.7691
-
 1
1 -
2
-
3
-
4
-
5
-
 6
6 -
 7
7 -
 8
8 -
 9
9 -
 10
10 -
 11
11 -
 12
12 -
 13
13 -
 14
14 -
 15
15 -
 16
16 -
17
-
18
-
19
-
20
 |
 |
