Black & Decker LST136B Instruction Manual - Page 11
AF-100
 |
View all Black & Decker LST136B manuals
Add to My Manuals
Save this manual to your list of manuals |
Page 11 highlights
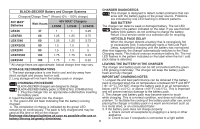
REPLACING THE SPOOL (figures P, Q and R) P • Remove battery from tool. • Depress the tabs (P1) and remove the spool cap (P2) from the spool housing (P3) in Replacement spool the trimmer head (figure P). Model # • Replace spool with BLACK+DECKER model AF-100 # AF-100. • Grasp empty spool with one P1 hand and spool housing with other hand and pull spool out. • If lever (Q1) in base of housing becomes dislodged, replace in correct position before inserting new spool Q into housing. • Remove any dirt and grass from the spool and housing. • Unfasten the end of the cutting line and guide the line into the eyelet (R2) figure R. • Take the new spool and push it onto the boss (Q2) in the housing. Rotate the spool slightly until it is seated. The line should protrude approximately 4-13/16 inches (122mm) from the housing. • Align the tabs on the spool R cap with the slots (R1) in the housing (figure R). • Push the cap onto the housing until it snaps securely into place. CAUTION: To avoid tool damage, if the cutting line R1 P2 P1 P3 Q1 Q2 protrudes beyond the trimming blade, cut it off so that it just reaches the blade. REWINDING SPOOL (use only .065 in. ROUND diameter line) (figures S, T & U) NOTE: Hand wound spools from bulk line are likely to become tangled more frequently than BLACK+DECKER factory wound spools. For best results, factory wound spools are recommended. To rewind spool, follow the steps below: S • Remove battery from tool. • Remove the empty spool from the tool as described in REPLACING THE SPOOL". • Make a fold at the end of the cutting line at about 3/4 inch (19mm)(S1). Feed the cutting line into one of the line holding slots (S2) as shown in figure S. S1 S2 • Insert the 3/4 inch (19mm) end of the bulk line into T T2 the hole (T1) in the spool T1 adjacent to the slot as shown in figure T. Make sure the line is pulled tight against the spool as shown in figure T. R2 11
-
 1
1 -
2
-
3
-
4
-
5
-
 6
6 -
 7
7 -
 8
8 -
 9
9 -
 10
10 -
 11
11 -
 12
12 -
 13
13 -
 14
14 -
 15
15 -
 16
16 -
17
-
18
-
19
-
20
-
21
-
22
-
23
-
24
-
25
-
26
-
27
-
28
-
29
-
30
-
31
-
32
-
33
-
34
-
35
-
36
-
37
-
38
-
39
-
40
-
41
-
42
-
43
-
44
 |
 |
