Blendtec Tom Dickson Extreme Blender Owners Manual - Page 12
Automatic And Custom Control Presets
 |
View all Blendtec Tom Dickson Extreme Blender manuals
Add to My Manuals
Save this manual to your list of manuals |
Page 12 highlights
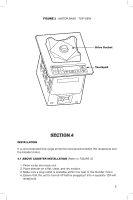
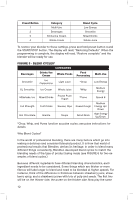
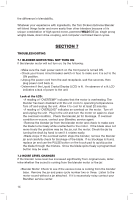
6.1 BEFORE YOU BEGIN OPERATION 1. Turn on the main power switch located on the front of the blender motor base. 2. Place ingredients in jar. 3. Place the blender jar on the base, making sure the jar is secure. 4. Attach the blender jar lid. 6.2 MANUAL CONTROLS START/STOP: The START/STOP button can be pressed at any time to stop the current blender function. PULSE: To use the high-speed pulse, simply hold the PULSE button for the desired amount of time. The blender will stop when you release the button. The pulse function can also be activated during a blend cycle. When the PULSE button is pressed the current cycle pauses and the pulse begins. When the PULSE button is released, the selected cycle resumes. The PULSE button is used when you want to chop, mince, whip, or do other momentary tasks which do not require a long blend cycle. When the PULSE button is pushed the motor will run only as long as the button is held down. As soon as the button is released the motor will shut off. SPEED UP/SPEED DOWN: Pressing the UP button will start a speed cycle for 50 seconds. During this time press or hold down the UP/DOWN arrows to control up to 10 speeds at which the blender can operate. The speed buttons allow you to manually control the blender and choose any of the available 10 speed settings. Simply press the SPEED UP button and the motor will begin. Continue pressing the SPEED UP key to increase the speed, or press the SPEED DOWN key at any time to decrease speed. After you have reached the desired speed release the button. Once you press a speed button, the blender will begin to run at the selected speed, and then shut off automatically after 50 seconds. To stop the cycle before the 50 seconds, press any button on the lower row. 6.3 AUTOMATIC AND CUSTOM CONTROL PRESETS BUTTONS - 1, 2, 3, 4: The four numbered buttons on the left side of the touchpad operate four customizable pre-selected blend cycles. To select one of these presets, simply press the designated button. The buttons are set at the factory to the following blend cycles: Preset Button 1 2 3 4 Blend Cycle Low Energy Smoothie Mixed Drinks Whole Juice 10
-
 1
1 -
2
-
3
-
4
-
5
-
6
-
 7
7 -
 8
8 -
 9
9 -
 10
10 -
 11
11 -
 12
12 -
 13
13 -
 14
14 -
 15
15 -
 16
16 -
 17
17 -
18
-
19
-
20
 |
 |
