Blendtec Tom Dickson Extreme Blender Owners Manual - Page 13
Enter the Menu Mode by pressing the SELECT CYCLE MENU button. Using
 |
View all Blendtec Tom Dickson Extreme Blender manuals
Add to My Manuals
Save this manual to your list of manuals |
Page 13 highlights
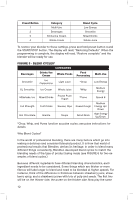
SELECTING A BLEND CYCLE FROM THE CYCLE MENU: To access the Cycle Menu, press the CYCLE MENU button. The first category to appear on the LCD display is BEVERAGES. Continue pressing or hold down the CYCLE MENU button to scroll through the cycle categories. A chart showing the blend cycle categories, and each specific blend cycle within a category is found in FIGURE 5. Once the desired blend cycle category has been reached, press or hold down the arrow keys to scroll through the blend cycles listed in that category. When you find a blend cycle you want to use, press the START/ STOP button. The LCD display will show the cycle name and the time remaining will be displayed while the cycle is running. After you have run a blend cycle, while still in the Menu Mode, the CYCLE MENU and UP/DOWN arrows can be used to select another blend cycle. Press the PULSE button to exit the Cycle Menu mode. FOOD PROCESSING BLEND CYCLES: Unlike the other cycles, the blend cycles in the FOOD PROCESSING category (Chop, Whip, and Puree) function similar to the pulse function. Use the START/STOP button as you would the PULSE button by pressing the button for the desired duration and releasing when finished. PROGRAMMING A PRESET BUTTON (Button 1-4): For blend cycles you use frequently, there are 4 preset buttons on the touchpad numbered 1, 2, 3, and 4, which you can use to save any of the pre-programmed blend cycles. This will allow you to simply press button 1, 2, 3, or 4, when you want to use that specific blend cycle. Enter the Menu Mode by pressing the SELECT CYCLE MENU button. Using the SELECT CYCLE MENU and UP/DOWN arrows, navigate to the cycle you wish to program onto the preset. When the desired blend cycle appears on the LED display, press and hold the desired preset button (button 1, 2, 3 or 4) for two seconds. The display will first show the name of the existing cycle, and then the display will read - "ProgrammingBttnX", where "X" is the number of the preset button. When the programming is complete, the display will read "Program Complete". The blender will exit the Menu Mode automatically, and the preset button is now available for use. The next time you choose that button, it will run the blend cycle which you have saved to it. If the blender fails to program the preset button, the display will read, "Program Failed". If you continue to receive this message after multiple attempts to program your blender, contact Blendtec customer service at 800-253-6383 for assistance. 6.4 RESTORING FACTORY DEFAULTS The Tom Dickson Extreme Blender has the following blend cycles set as factory defaults for preset buttons numbered 1, 2, 3, and 4: 11
-
 1
1 -
2
-
3
-
4
-
5
-
6
-
7
-
 8
8 -
 9
9 -
 10
10 -
 11
11 -
 12
12 -
 13
13 -
 14
14 -
 15
15 -
 16
16 -
 17
17 -
 18
18 -
19
-
20
 |
 |
