Bosch 1640VS Operating Instructions - Page 10
FIG. 11, FIG. 13, FIG. 12 - saw
 |
UPC - 000346309652
View all Bosch 1640VS manuals
Add to My Manuals
Save this manual to your list of manuals |
Page 10 highlights
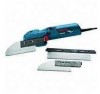
BM 2610006360 03-09:BM 2610006360 03-09 3/18/09 1:42 PM Page 10 ADJUSTING THE ANGLE INDICATOR If necessary, the position of the angle indicator can be re-adjusted. Loosen the screws on the underside of the miter table attachment (approx. 1/2 turn). Also loosen the preset angle release button and locking screw if necessary. Align the saw blade of the mounted saw with the aid of a protractor or square to achieve the 0º setting. Tighten the thumbscrew to secure setting, then securely tighten the screws on the underside of the table attachment (Fig. 11). FIG. 11 ANGLE INDICATOR ADJUSTMENT SCREWS DUST EXTRACTION The miter table attachment is equipped with a dust port for dust extraction. To use this feature, attach a vacuum hose to the dust port, and then attach opposite end to a shop vacuum cleaner (Fig. 13). FIG. 13 LOCKING SCREW ALIGNING SAW BLADE 90º TO THE MITER TABLE ATTACHMENT If necessary, the blade can be re-aligned to be 90º to the table. First, loosen the thumbscrew. Then align the saw blade of the mounted saw with the aid of a square. Rotate the blade alignment screw clockwise or counterclockwise until you achieve the 90 degree setting. Then tighten the thumbscrew (Fig. 12). FIG. 12 BLADE ALIGNMENT SCREW DUST PORT -10-
-
 1
1 -
2
-
3
-
4
-
 5
5 -
 6
6 -
 7
7 -
 8
8 -
 9
9 -
 10
10 -
 11
11 -
 12
12 -
 13
13 -
 14
14 -
 15
15 -
16
-
17
-
18
-
19
-
20
-
21
-
22
-
23
-
24
-
25
-
26
-
27
-
28
-
29
-
30
-
31
-
32
-
33
-
34
-
35
-
36
-
37
-
38
-
39
-
40
-
41
-
42
-
43
-
44
 |
 |
