Bosch 1640VS Operating Instructions - Page 8
Assembly - blade
 |
UPC - 000346309652
View all Bosch 1640VS manuals
Add to My Manuals
Save this manual to your list of manuals |
Page 8 highlights
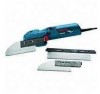
BM 2610006360 03-09:BM 2610006360 03-09 3/18/09 1:42 PM Page 8 Assembly INSERTING AND CHANGING THE BLADE The machine is equipped with a Bosch "Clic" blade-clamping device. This feature makes changing blades simple and fast without additional tools. FLUSH-CUT SAW BLADE This blade's teeth are offset from the blade guide, which facilitates flush cutting. The flush-cut saw blade can be attached to the tool depending on desired sawing direction, or personal preference figures A or B). A B FIG. 3 If necessary, wipe the blade clean. Only then should the saw teeth protector be removed. Insert plug into power source and turn tool on briefly (See Operating Instructions for Saw Section). This will allow the saw blade pin to engage into the blade to drive the blade back and forth. Turn tool off. To change the blade, place the saw teeth protector onto the blade and press the "Clic" button. This causes the tab to spring out of the locking spring, then remove the blade. GENERAL PURPOSE SAW BLADE The general purpose saw blade can also be attached depending on desired sawing direction or personal preference (Fig. 6). FIG. 6 16P4r0oVfSessional Hook the respective small tab for sawing direction (A) or (B) completely onto hook as shown in figures 4 or 5 depending on personal preference. Then swing the saw blade in the direction of the arrow and press the large tab onto the locking spring until it latches. FIG. 4 HOOK BLADE "CLIC" BUTTON BLADE SMALL TAB LARGE TAB FIG. 5 DRIVE PIN LOCKING SPRING HOOK Hook the respective small tab for sawing direction (C) or (D) completely onto hook as shown in figures 7 or 8 depending on personal preference. Then swing the saw blade in the direction of the arrow and press the large tab onto the locking spring until it latches. FIG. 7 HOOK SMALL TAB SMALL TAB LARGE TAB DRIVE PIN LOCKING SPRING LARGE TAB -8- DRIVE PIN LOCKING SPRING
-
 1
1 -
2
-
 3
3 -
 4
4 -
 5
5 -
 6
6 -
 7
7 -
 8
8 -
 9
9 -
 10
10 -
 11
11 -
 12
12 -
 13
13 -
14
-
15
-
16
-
17
-
18
-
19
-
20
-
21
-
22
-
23
-
24
-
25
-
26
-
27
-
28
-
29
-
30
-
31
-
32
-
33
-
34
-
35
-
36
-
37
-
38
-
39
-
40
-
41
-
42
-
43
-
44
 |
 |
