Bosch B20CS51SNI Installation and Use & Care - Page 13
Caution
 |
View all Bosch B20CS51SNI manuals
Add to My Manuals
Save this manual to your list of manuals |
Page 13 highlights
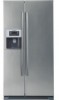
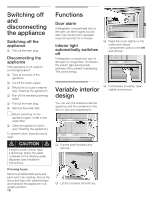
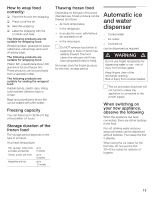
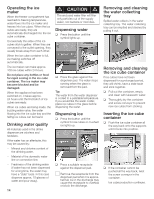
Operating the ice maker When the freezer compartment has reached its freezing temperature, water flows into the ice maker and freezes into ice cubes. When the ice cubes are ready, they are automatically discharged into the ice cube container. Occasionally the sides of the ice cubes stick together. When they are conveyed to the outlet opening, they usually break away from each other. When the ice cube container is full, ice making switches off automatically. The ice maker can make approx. 100 ice cubes within 24 hours. Do not place any bottles or food for rapid cooling in the ice cube container. The ice maker may become blocked and be damaged. When the appliance has been switched on, it takes approx. 24 hours until the first batch of ice cubes are ready. When ice cubes are being made, the buzzing water valve, the water flowing into the ice cube tray and the falling ice cubes can be heard. Drinking water quality All materials used in the drinks dispenser are odorless and tasteless. If the water has an aftertaste, this may be caused by: - Mineral and chlorine content of the drinking water. - Material of the domestic water line or connection line. - Freshness of the drinking water (if water has not been dispensed for a long time, the water may have a stale" taste. In this case dispense approx. 15 glasses of water and pour away). 14 d CAUTION d The enclosed water filter will filter only particles out of the supply water, not bacteria or microbes. Dispensing water q Press the button until the symbol lights up. q Press the glass against the dispenser pad. The water stops running when the glass is removed from the pad. Tip: The water from the water dispenser is cooled to a palatable temperature. If you would like the water colder, place ice cubes in the glass before dispensing the water. Dispensing ice q Press the button until the symbol for ice cubes or crushed ice lights up. q Press a suitable receptacle against the dispenser pad. i Remove the receptacle from the dispenser pad when it is approx. half full. Ice in the discharge may cause the receptacle to overflow or block the discharge. Removing and cleaning the water collecting tray Spilled water collects in the water collecting tray. The water collecting tray can be emptied and cleaned by pulling it out. Removing and cleaning the ice cube container If ice cubes have not been dispensed for a prolonged period, they will shrink, have a stale taste and stick together. q Pull out the container, empty and clean with lukewarm water. q Thoroughly dry the container and screw conveyor to prevent new ice cubes from sticking. Inserting the ice cube container q Push the ice cube container all the way back onto the supports until it locks into position. q If the container cannot be pushed all the way back, twist the screw conveyor in the container. Ice cube production continues.
-
 1
1 -
2
-
3
-
4
-
5
-
6
-
7
-
 8
8 -
 9
9 -
 10
10 -
 11
11 -
 12
12 -
 13
13 -
 14
14 -
 15
15 -
 16
16 -
 17
17 -
 18
18 -
19
-
20
-
21
-
22
-
23
-
24
-
25
-
26
-
27
-
28
-
29
-
30
-
31
-
32
-
33
-
34
-
35
-
36
-
37
-
38
-
39
-
40
-
41
-
42
-
43
-
44
-
45
-
46
-
47
-
48
-
49
-
50
-
51
-
52
-
53
-
54
-
55
-
56
-
57
-
58
-
59
-
60
-
61
-
62
-
63
-
64
-
65
-
66
-
67
-
68
-
69
-
70
-
71
-
72
-
73
-
74
-
75
-
76
-
77
 |
 |