Bosch B20CS51SNI Installation and Use & Care - Page 22
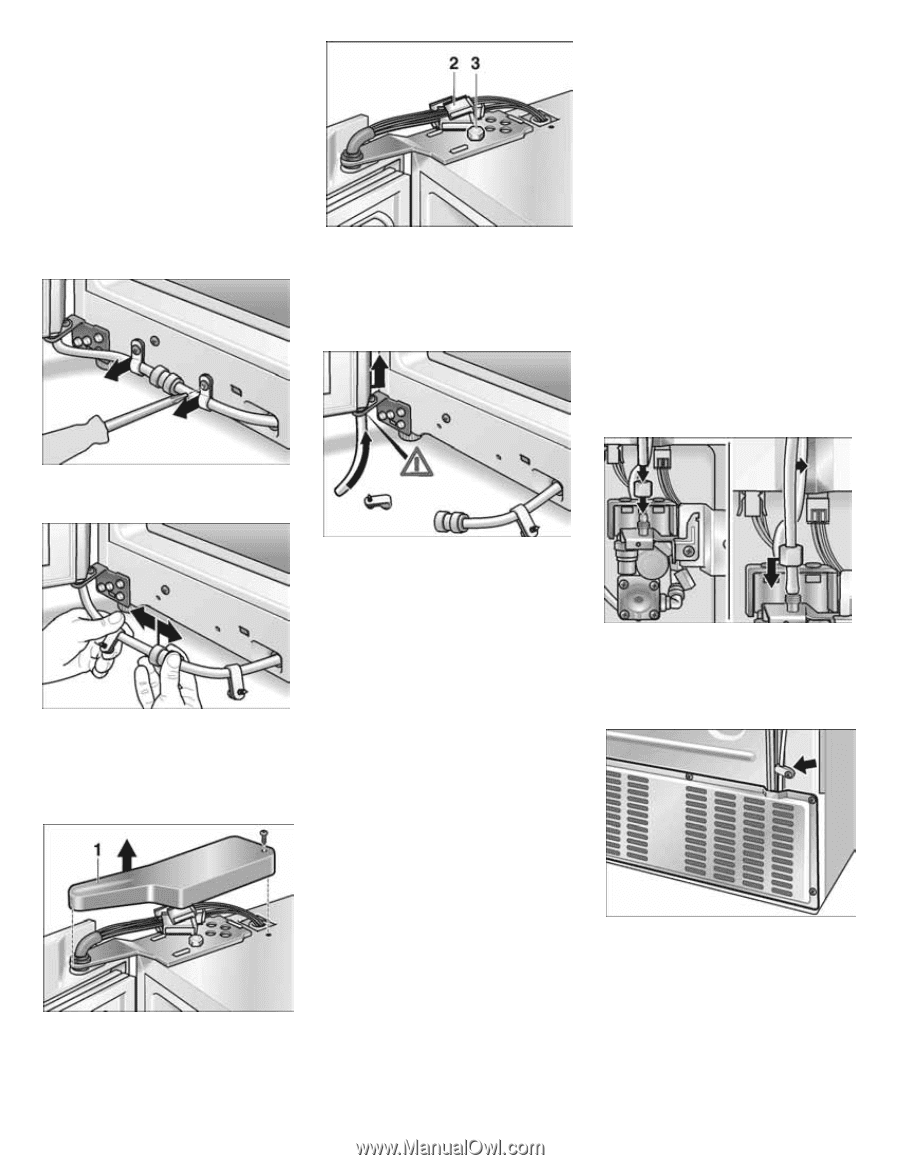
Unscrewing the, doors, Connecting, appliance, to the, water, supply
 |
View all Bosch B20CS51SNI manuals
Add to My Manuals
Save this manual to your list of manuals |
Page 22 highlights
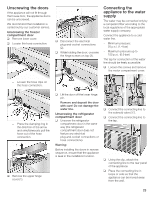
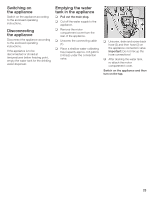
Unscrewing the doors If the appliance will not fit through the house door, the appliance doors can be unscrewed. We recommend that installation is carried out by our customer service. Unscrewing the freezer compartment door q Remove lower cover. q Loosen the hose connection: q Disconnect the electrical plugĆandĆsocket connections (2). q While holding the door, unscrew the hinge screws on top (3). Connecting the appliance to the water supply The water may be connected only by a competent fitter according to the local regulations of the appropriate water supply company. Connect the appliance to a cold water line. - Minimum pressure: 20 p.s.i. (1.4 bar) - Maximum pressure up to 100 p.s.i. (6.9 bar) The tap for connection of the water line should be freely accessible. q Loosen the screws and remove the motor compartment cover. - Loosen the hose clips on the hose connection. - Press the clamping ring in the direction of the arrow and simultaneously pull the hose out of the hose connection. q Remove the upper hinge cover (1). q Lift the door off the lower hinge pin. Remove and deposit the door with care! Do not damage the water line. Unscrewing the refrigerator compartment door q Unscrew the refrigerator compartment door in the same way (the refrigerator compartment door does not feature any electrical plugĆandĆsocket connections or hose connections). Warning: Before installing the doors in reverse sequence, ensure that the appliance is level in the installation location. q Connect the connecting line to the solenoid valve (¼"). q Connect the connecting line to the tap. q Using the clip, attach the connecting line to the rear panel of the appliance. q Place the connecting line in loops or coils so that the appliance can be moved away from the wall. 23
-
 1
1 -
2
-
3
-
4
-
5
-
6
-
7
-
8
-
9
-
10
-
11
-
12
-
13
-
14
-
15
-
16
-
 17
17 -
 18
18 -
 19
19 -
 20
20 -
 21
21 -
 22
22 -
 23
23 -
 24
24 -
 25
25 -
 26
26 -
 27
27 -
28
-
29
-
30
-
31
-
32
-
33
-
34
-
35
-
36
-
37
-
38
-
39
-
40
-
41
-
42
-
43
-
44
-
45
-
46
-
47
-
48
-
49
-
50
-
51
-
52
-
53
-
54
-
55
-
56
-
57
-
58
-
59
-
60
-
61
-
62
-
63
-
64
-
65
-
66
-
67
-
68
-
69
-
70
-
71
-
72
-
73
-
74
-
75
-
76
-
77
 |
 |