Bosch GRL145HV Operating Instructions - Page 11
Attaching the RCR2 to the Bracket, Operation, Activate the RCR2, Turn on the tool, Select
 |
UPC - 000346387285
View all Bosch GRL145HV manuals
Add to My Manuals
Save this manual to your list of manuals |
Page 11 highlights
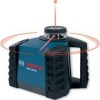
Attaching the RCR2 to the Bracket The RCR2 can be attached to the its bracket with either a level or plumb allocation depending on whether it is being used to locate the level or plumb laser beam. 3. Select the Operating Mode by pressing the dithering/dot button to change to dithering/dot mode CAL Laser beam in dithering/dot mode, detector off CAL Level laser detection Plumb laser detection The bracket's clamp is used to attach it to a grade/leveling rod. Operation 1. Activate the RCR2 by pressing its power on/off button. The unit emits a single beep, and icons in the lower portion of the LCD display appear, showing all available options. This confirms that the unit is activated, but the GRL145HV and RCR2 have not been turned on. CAL RF remote control / Laser detector activated 2. Turn on the tool by pressing the laser on/off button from the keypad. As soon as the tool is turned on, the displayed icons confirm that the laser has started in Rotation mode, at the slowest speed. Note: The LCD display shows the laser modes for commands transmitted to the tool from the RF remote control. Commands made from the tool controls are not shown on the RF remote control/laser receiver-detector LCD display. The laser dot or dithering line can be positioned through a 360° range in the level or plumb plane by pressing one of the two Dot/Line position control buttons. In dot mode, a single press of either buttons will move the dot in small increments in the corresponding direction. Pressing and holding either button moves the dot in continuous slow motion for the first five seconds, and pressing and holding beyond five seconds moves the dot in faster speed. 4. Manual Sloping The RCR2 can be used to put the tool into manual slope mode by pressing the rotation and dithering/dot buttons simultaneously and holding for 3 seconds. The unit will beep twice to indicate the unit is in manual slope mode. Note that the unit will not self-level when in the manual slope mode. Use the slope control buttons located on the lower portion of the keypad to move the beam up or down to the desired slope angle. While in the manual slope function, the tool can be operated in the point, dither or rotation modes. When the beam reaches its minimum or maximum allowable slope, a continuous beep sound is heard on further key press. When the beam reaches its minimum or maximum allowable slope, a continuous beep sound is heard on further key press. To return the tool back to the self-leveling mode, press the rotation and dithering/dot buttons simultaneously for 3 seconds. The unit will beep once to indicate that it is back in self-leveling mode. Laser beam in rotation mode, detector off Laser beam in manual slope dot mode, Detector off -11-
-
 1
1 -
2
-
3
-
4
-
5
-
 6
6 -
 7
7 -
 8
8 -
 9
9 -
 10
10 -
 11
11 -
 12
12 -
 13
13 -
 14
14 -
 15
15 -
 16
16 -
17
-
18
-
19
-
20
-
21
-
22
-
23
-
24
-
25
-
26
-
27
-
28
-
29
-
30
-
31
-
32
-
33
-
34
-
35
-
36
-
37
-
38
-
39
-
40
-
41
-
42
-
43
-
44
 |
 |
