Bosch HBL8651UC Installation Instructions - Page 11
Installing the Oven Unit into, the Wall Cabinet - model
 |
View all Bosch HBL8651UC manuals
Add to My Manuals
Save this manual to your list of manuals |
Page 11 highlights
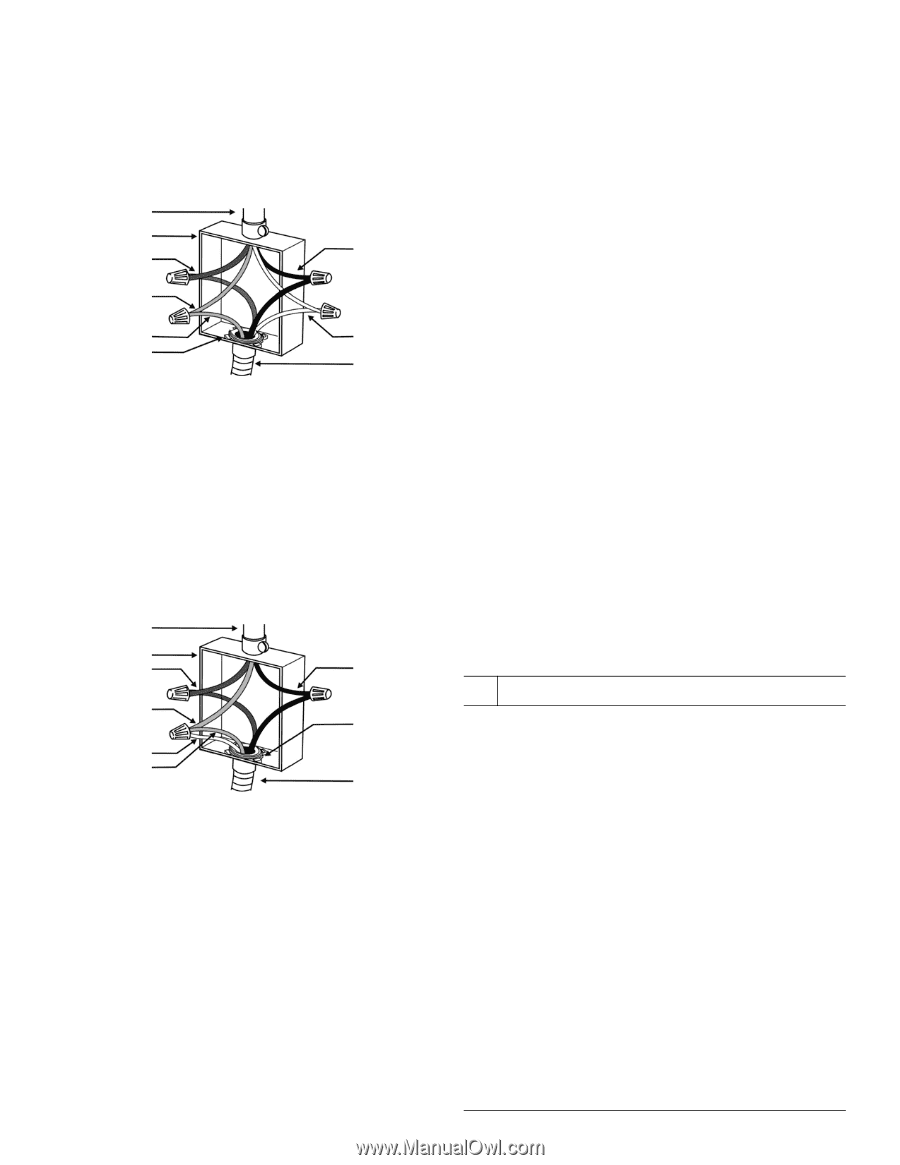
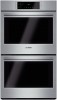
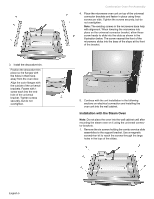
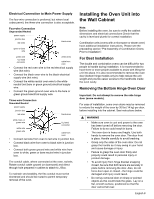
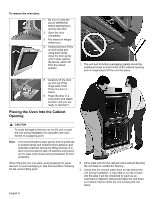
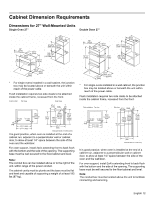
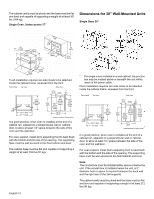
Electrical Connection to Main Power Supply The four-wire connection is preferred, but where local codes permit, the three wire connection is also acceptable. Four-wire Connection Ungrounded Neutral power supply junction box red wires black wires green or bare wire green wire UL listed connector white wires cable from oven • Connect the red oven wire to the red electrical supply wire (hot wire). • Connect the black oven wire to the black electrical supply wire (hot wire). • Connect the white neutral oven wire to the white neutral (not bare or green ground) electrical supply wire. • Connect the green ground oven wire to the bare or green ground electrical supply wire. Three-wire Connection Grounded Neutral power supply junction box red wires black wires white, bare, or green wire UL listed connector white wire green wire cable from oven • Connect red wire from oven to red wire in junction box. • Connect black wire from oven to black wire in junction box. • Connect both green ground wire and white wire from oven to white, green or bare neutral wire in junction box. The conduit cable, where connected at the oven, swivels. Rotate conduit cable upward (or downward) and direct through hole prepared in cabinet to attach to J-Box. To maintain serviceability, the flex conduit must not be shortened and should be routed to permit temporary removal of the oven. Installing the Oven Unit into the Wall Cabinet Note: Before installing the oven, be sure to verify the cabinet dimensions and electrical connections.Check that the cavity is level and plumb for correct installation. Combination units (ovens with a microwave or steam oven) have additional installation instructions. Please see the preceeding section "Pre-Assembly of Combination Ovens Prior to Installation". For Best Installation The double and combination ovens can be difficult for two people to handle during installation. It is recommended to have three or more people available to assist with lifting the unit into place. It is also recommended to remove the oven door (bottom hinge models only) to help reduce the unit weight and provide easier access to the handholds inside the oven cavity. Removing the Bottom Hinge Oven Door Important: Do not attempt to remove the side hinge door (some models). For ease of installation, some oven doors may be removed to reduce the weight of the oven by 30 lbs (14 kg) per door, before installing into the cabinet. See instructions below. 9 WARNING • Make sure oven is cool and power to the oven has been turned off before removing the door. Failure to do so could result in burns. • The oven door is heavy and fragile. Use both hands to remove the oven door. The door front is glass. Handle carefully to avoid breaking. • Grasp only the sides of the oven door. Do not grasp the handle as it may swing in your hand and cause damage or injury. • Failure to grasp the oven door firmly and properly could result in personal injury or product damage. • To avoid injury from hinge bracket snapping closed, be sure that both levers are securely in place before removing the door. Also, do not force door open or closed - the hinge could be damaged and injury could result. • Do not lay removed door on sharp or pointed objects as this could break the glass. Lay on a flat, smooth surface, positioned so that the door cannot fall over. English 8
-
 1
1 -
2
-
3
-
4
-
5
-
 6
6 -
 7
7 -
 8
8 -
 9
9 -
 10
10 -
 11
11 -
 12
12 -
 13
13 -
 14
14 -
 15
15 -
 16
16 -
17
-
18
-
19
-
20
-
21
-
22
-
23
-
24
-
25
-
26
-
27
-
28
-
29
-
30
-
31
-
32
-
33
-
34
-
35
-
36
-
37
-
38
-
39
-
40
-
41
-
42
-
43
-
44
-
45
-
46
-
47
-
48
-
49
-
50
-
51
-
52
-
53
-
54
-
55
-
56
 |
 |