Bosch Hamburg MP57 Operating Instructions - Page 47
CLOCK ON/OFF is displayed.
 |
UPC - 028851904438
View all Bosch Hamburg MP57 manuals
Add to My Manuals
Save this manual to your list of manuals |
Page 47 highlights
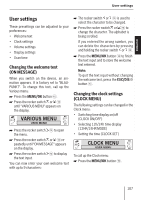
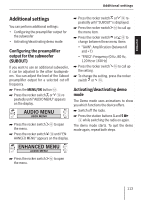
User settings u Press the rocker switch or = repeatedly until "CLOCK MENU" appears on the display. u Press the rocker switch : to open the menu. The Clock menu appears. Switching time display on/off The time can be displayed while the device is switched off, if the vehicle ignition is switched on. To switch this time display on/off: u In the Clock menu, press the rocker switch or = repeatedly until "CLOCK ON/OFF" is displayed. u Press the rocker switch or : to change between these settings: • "CLOCK ON": The time display is switched on. • "CLOCK OFF": The time display is switched off. Note: Note if you switched on the time display (CLOCK ON): • When switching off the device, the usual "Goodbye" animation does not appear. • Key combinations, e.g. for calling the Demo mode, are no longer possible. Selecting 12h/24h time display (12HR/24HR MODE) The time can be displayed using the 12-hour or 24-hour format. u In the Clock menu, press the rocker switch or = repeatedly until "12HR/24HR MODE" is displayed. u Press the rocker switch or : to change between these settings: • "12HR MODE": The 12-hour format (am/pm) is switched on. • "24HR MODE": The 24-hour format is switched on. Setting the clock u In the Clock menu, press the rocker switch or = repeatedly until "CLOCK SET" is displayed. u Press the rocker switch : to open the menu. The time is displayed. u Select the hours or minutes with the rocker switch or :. u Press the rocker switch or = to change the hours/minutes. u Press the MENU/OK button < to finish the input and store the time. Note: To finish the input without changing the time, press the ESC/DIS button 5. 108
-
 1
1 -
2
-
3
-
4
-
5
-
6
-
7
-
8
-
9
-
10
-
11
-
12
-
13
-
14
-
15
-
16
-
17
-
18
-
19
-
20
-
21
-
22
-
23
-
24
-
25
-
26
-
27
-
28
-
29
-
30
-
31
-
32
-
33
-
34
-
35
-
36
-
37
-
38
-
39
-
40
-
41
-
 42
42 -
 43
43 -
 44
44 -
 45
45 -
 46
46 -
 47
47 -
 48
48 -
 49
49 -
 50
50 -
 51
51 -
 52
52 -
53
-
54
-
55
-
56
-
57
-
58
-
59
-
60
-
61
-
62
-
63
 |
 |
