Bosch TAS5542UC Instructions for Use - Page 11
Caution - tassimo manual
 |
View all Bosch TAS5542UC manuals
Add to My Manuals
Save this manual to your list of manuals |
Page 11 highlights
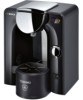
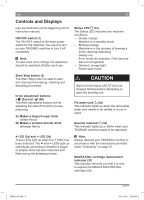
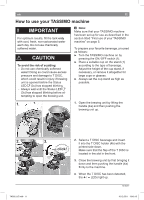
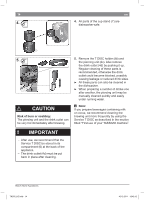
en Controls and Displays (see the illustration at the beginning of this instruction manual) ON / OFF switch (1) The ON / OFF switch is the main power switch for the machine. You use it to turn on your TASSIMO machine or turn it off completely. i Note: To save even more energy, the appliance should be switched off after each use. Start / Stop button (2) The Start / Stop button is used to start and interrupt the brewing, cleaning and descaling processes. Drink adjustment buttons + (2a) and - (2b) The drink adjustment buttons are for adjusting the size of the drink you are preparing: 2a Makes a larger / longer drink (milder lavor) 2b Makes a smaller / shorter drink (stronger lavor) + LED (3a) and − LED (3b) These LEDs light up when the T DISC has been detected. The + and − LEDs light up individually according to whether a bigger or smaller drink has been selected and lash during the brewing process. 9 Status LED F (3c) The Status LED indicates four machine conditions: - Steady orange: Machine is in standby mode - Blinking orange: Machine is in the process of brewing a drink / cleaning / descaling - Steady red: Error mode (for example, if the barcode was not recognized) - Dimmed, orange light: Power-save mode ¡ CAuTION Wait until the Status LED F (3c) has stopped blinking before attempting to open the brewing unit. Fill water tank T (3d) This indicator lights up when the removable water tank needs to be reilled or is not in place. Descale required Q (3e) This indicator lights up or blinks when your TASSIMO machine needs to be descaled. i Note: Always descale your TASSIMO machine in accordance with the instructions provided under "Descaling" on page 15. MAVEA ilter cartridge replacement indicator (3f) This indicator reminds you that it is time to replace the MAVEA MAXTRA ilter cartridge (5d). TAS55_UC.indb 9 12/2011 16.12.2011 13:45:09
-
 1
1 -
2
-
3
-
4
-
5
-
 6
6 -
 7
7 -
 8
8 -
 9
9 -
 10
10 -
 11
11 -
 12
12 -
 13
13 -
 14
14 -
 15
15 -
 16
16 -
17
-
18
-
19
-
20
-
21
-
22
-
23
-
24
-
25
-
26
-
27
-
28
-
29
-
30
-
31
-
32
-
33
-
34
-
35
-
36
-
37
-
38
-
39
-
40
-
41
-
42
-
43
-
44
-
45
-
46
-
47
-
48
-
49
-
50
-
51
-
52
-
53
-
54
-
55
-
56
-
57
-
58
-
59
-
60
-
61
-
62
-
63
-
64
-
65
-
66
-
67
-
68
-
69
-
70
-
71
-
72
-
73
-
74
 |
 |