Bosch WFVC5400UC User Manual - Page 11
Checklist, Installation, Removing, transport, assemblies - white
 |
UPC - 825225874188
View all Bosch WFVC5400UC manuals
Add to My Manuals
Save this manual to your list of manuals |
Page 11 highlights
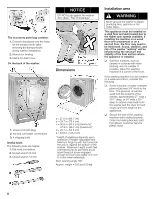
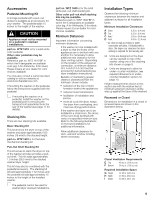
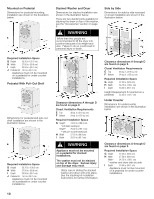
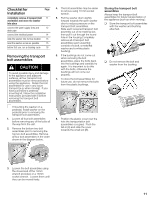
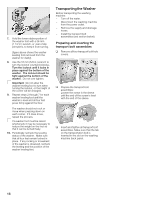
Checklist for Page Installation completely remove 4 transport bolt 11 assemblies and move the washer into place connect the water supply lines and 12 drain pipe connect the electrical power 14 slide the washer into its final location 15 level the washer as low as possible 15 before first use, run a cleaning cycle 18 Removing the transport bolt assemblies , CAUTION To avoid possible injury and damage to the appliance and adjacent surfaces, all four transport bolt assemblies must be removed before using the appliance. Retain the bolt assemblies for use in any future transport (e.g. when moving). If you have purchased a pedestal mounting kit, follow the installation instructions provided with it before removing the transport bolt assemblies. i If mounting the washer on a pedestal, install washer on the pedestal prior to removing the transport bolt assemblies. 1. Loosen all four bolt assemblies before removing any of the bolts all the way from the unit. 2. Remove the bottom two bolt assemblies prior to removing the top two bolt assemblies. Remove all four bolt assemblies in the order shown in the diagram below. 4. The bolt assemblies may be easier to remove using 13 mm socket wrench. 5. Pull the washer drum slightly forward towards the open washer door to reduce pressure on the transport bolt assemblies. Slide each loosened transport bolt assembly out of its retaining slot, then pull it out through the round hole in the housing.Completely remove all 4 transport bolt assemblies (each assembly consists of a bolt, a metal flat washer and a white plastic bushing). 6. If the bushings do not come out when removing the bolt assemblies, place the bolts back into the bushings and carefully try again. It is important to do this with the bolts, otherwise the bushings will not come out properly. 7. To store the bolt assemblies for future use, do not remove the bolts from the plastic bushings. 8. Position the plastic cover over the hole the transportation bolt assemblies occupied. Push the tab in (A) and slide the cover towards the small slot (B). Storing the transport bolt assemblies Always keep the transport bolt assemblies for future transportation of the appliance (such as when moving ). q Store the transport bolt assemblies with the washer and bushing attached. q Do not remove the bolt and washer from the bushing. 3. Loosen the bolt assemblies using the closed end of the 13mm wrench provided, or a 13mm socket wrench. Loosen them until they can be moved freely. 11
-
 1
1 -
2
-
3
-
4
-
5
-
 6
6 -
 7
7 -
 8
8 -
 9
9 -
 10
10 -
 11
11 -
 12
12 -
 13
13 -
 14
14 -
 15
15 -
 16
16 -
17
-
18
-
19
-
20
-
21
-
22
-
23
-
24
-
25
-
26
-
27
-
28
-
29
-
30
-
31
-
32
-
33
-
34
-
35
-
36
-
37
-
38
-
39
-
40
-
41
-
42
-
43
-
44
-
45
-
46
-
47
-
48
-
49
-
50
-
51
-
52
-
53
-
54
-
55
-
56
-
57
-
58
-
59
-
60
-
61
-
62
-
63
-
64
-
65
-
66
-
67
-
68
-
69
-
70
-
71
-
72
-
73
-
74
-
75
-
76
-
77
-
78
-
79
-
80
-
81
-
82
-
83
-
84
-
85
-
86
-
87
-
88
-
89
-
90
-
91
-
92
-
93
-
94
-
95
-
96
-
97
-
98
-
99
-
100
-
101
-
102
-
103
-
104
 |
 |