Bose Lifestyle 50 Owner's guide - Page 19
Connecting power to your system, Setting up the Personal, music center - no response
 |
View all Bose Lifestyle 50 manuals
Add to My Manuals
Save this manual to your list of manuals |
Page 19 highlights
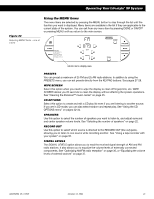
Setting Up Connecting power to your system Plug the Acoustimass® module power cord into an AC power (mains) outlet. Then plug in the multi-room interface power pack. Note: Your speakers will not operate unless you complete all cable and power connections before turning on the system. CAUTION: Be sure the three shipping screws on the bottom of the CD changer have been removed before turning on the system. Setting up the Personal™ music center Set up the Personal music center after the rest of the system is connected and plugged in. Note: When batteries are first installed in the music center, it sets up a radio-frequency link with the closest multi-room interface. 1. Hold the music center within a few feet of the multi-room interface. 2. Slide open the battery compartment on the back of the music center (Figure 17). 3. Insert 4 AAA or IEC-R03 1.5V batteries, or the equivalent, as shown. Match the + and - symbols on the batteries with the + and - markings inside the compartment. 4. Slide the battery compartment cover back into place. 5. Turn the music center over and touch the screen to wake it up if it appears blank. Press ON/OFF, FM, or any other source button to turn the system on. If the music center continuously displays "NO RESPONSE," you need to try to establish its link with the multi-room interface again. Hold the music center close to the multi-room interface. Press and hold MUTE for about 5 seconds until you hear a beep and then release. After about 10 seconds, the music center should beep twice to confirm that the link is established. Figure 17 Installing batteries and waking up the display for the first time 4 AAA batteries Battery compartment cover a. Install batteries b. Turn over and wake up display Note: Replace the batteries when the LOW BATTERY message first appears. See "Replacing batteries" on page 44. Alkaline batteries are recommended. AM189854_05_V.PDF October 17, 2001 17
-
 1
1 -
2
-
3
-
4
-
5
-
6
-
7
-
8
-
9
-
10
-
11
-
12
-
13
-
 14
14 -
 15
15 -
 16
16 -
 17
17 -
 18
18 -
 19
19 -
 20
20 -
 21
21 -
 22
22 -
 23
23 -
 24
24 -
25
-
26
-
27
-
28
-
29
-
30
-
31
-
32
-
33
-
34
-
35
-
36
-
37
-
38
-
39
-
40
-
41
-
42
-
43
-
44
-
45
-
46
-
47
-
48
-
49
-
50
-
51
-
52
-
53
-
54
-
55
 |
 |
