Brother International 3200c Quick Setup Guide - English - Page 7
Installing the Ink Cartridges, Warning
 |
UPC - 012502604921
View all Brother International 3200c manuals
Add to My Manuals
Save this manual to your list of manuals |
Page 7 highlights
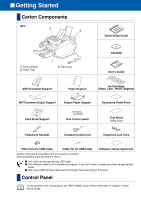
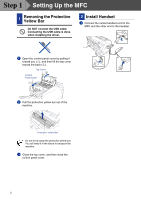
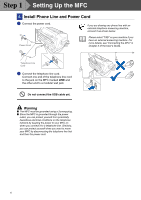
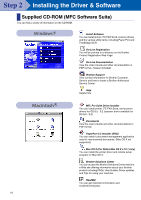
Setting Up the MFC 6 Installing the Ink Cartridges Warning If ink gets in your eyes irrigate them with water immediately, and if irritation occurs consult a doctor. 1 Make sure that the power is turned on. The LCD shows; CHECK CARTRIDGE 2 Open the control panel cover by pulling it toward you (1), then lift the top cover toward the back (2). The print heads will move to the ink replacement position. Top Cover Control Panel Cover 5 Remove the white shipping cover by pulling it towards you. White Shipping Cover I The bottom of the white shipping cover is wet with ink that will cause stains, so wipe it clean before you place it down. I Do not throw away the white shipping cover. You will need it when you transport the machine. 6 Take out black ink cartridge. Windows® 98/98SE/Me/ 2000 Professional Windows® XP Macintosh® OS 8.5-9.2 Macintosh® OS X 10.1 3 Remove the protective blue tape from the colored ink cartridge covers. 4 Push the four colored ink cartridge covers one at a time so they pop up. Colored Ink Cartridge Covers PUSH PUSH PUSH PUSH 7 Carefully remove the sealing tape from the bottom of the ink cartridge. To prevent spilling ink and staining your hands and clothing, peel the sealing tape gently and slowly. Opening Do not touch the ink opening on the cartridge or removed tape. To be continued 5
-
 1
1 -
 2
2 -
 3
3 -
 4
4 -
 5
5 -
 6
6 -
 7
7 -
 8
8 -
 9
9 -
 10
10 -
 11
11 -
 12
12 -
13
-
14
-
15
-
16
-
17
-
18
-
19
-
20
-
21
-
22
-
23
-
24
-
25
-
26
-
27
-
28
-
29
-
30
-
31
 |
 |
