Brother International BAS-342G PS Instruction Manual - English - Page 19
Installing the solenoid valve assembly, 4-9. Connecting the air tubes [4]
 |
View all Brother International BAS-342G PS manuals
Add to My Manuals
Save this manual to your list of manuals |
Page 19 highlights
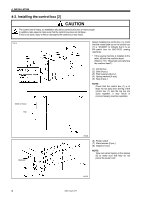
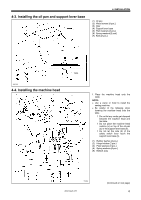
4-8. Installing the solenoid valve assembly 4. INSTALLATION Install underneath the work table. (Refer to "3. Table processing diagram" for the installation positions.) (1) Solenoid valve assembly (2) Washers [2 pcs.] (3) Wood screws [2 pcs.] NOTE: Make sure that the solenoid valve assembly does not touch the control box or the leg of the table. 4-9. Connecting the air tubes [4] Connect as shown in the illustration while checking the marks. 2745B Plugs 4 Branch unions Y 4-10. Installing the air hose [5] Close Open 2746B 1. Close the cock (1). 2. Turn the nut (3) at the end of the air hose (2) and connect it to the valve (4). 3. Open the cock at the compressor. * Check that no air is leaking from the connection of the valve (4) and air hose (2). 4. Open the cock (1). (The meter pointer will turn clockwise.) NOTE: Turn the cock (1) gently to open it. 5. Adjust the air pressure. (Refer to the next page.) 2747B BAS-342G PS 10
-
 1
1 -
2
-
3
-
4
-
5
-
6
-
7
-
8
-
9
-
10
-
11
-
12
-
13
-
 14
14 -
 15
15 -
 16
16 -
 17
17 -
 18
18 -
 19
19 -
 20
20 -
 21
21 -
 22
22 -
 23
23 -
 24
24 -
25
-
26
-
27
-
28
-
29
-
30
-
31
-
32
-
33
-
34
-
35
-
36
-
37
-
38
-
39
-
40
-
41
-
42
-
43
-
44
-
45
-
46
-
47
-
48
-
49
-
50
-
51
-
52
-
53
-
54
-
55
-
56
-
57
-
58
-
59
-
60
-
61
-
62
-
63
-
64
-
65
-
66
-
67
-
68
-
69
-
70
-
71
-
72
-
73
-
74
-
75
-
76
-
77
-
78
-
79
-
80
-
81
-
82
-
83
-
84
-
85
-
86
 |
 |
