Brother International BES-916AC Instruction Manual - English - Page 136
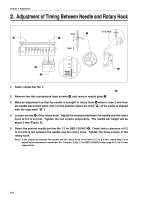
Adjustment of Timing Between Needle and Rotary Hook
 |
View all Brother International BES-916AC manuals
Add to My Manuals
Save this manual to your list of manuals |
Page 136 highlights
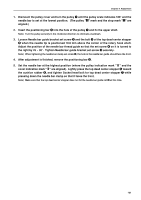
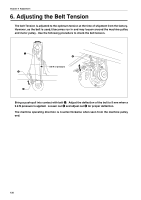
Chapter 8 Adjustment 2. Adjustment of Timing Between Needle and Rotary Hook 2mm r 0.2-0.4mm y q 2mm w t e 1. Select needle bar No. 1. The above figure shows model BES-916AC. For model BES-1216AC, needle bar No. 12 corresponds to y. 2. Remove two flat countersunk head screws w, and remove needle plate e. 3. Make an adjustment so that the needle is brought to rotary hook r when it rises 2 mm from the needle bar bottom point (180°) (in the position where the mark " " of the pulley is aligned with the stop mark " "). 4. Loosen screws t of the rotary hook. Adjust the clearance between the needle and the rotary hook to 0.2 to 0.4 mm. Tighten the two screws temporarily. The needle bar height will be about 2 mm (Figure A). 5. Select the second needle bar (bar No. 12 for BES-1216AC) y. Check that a clearance of 0.2 to 0.4 mm is left between the needle and the rotary hook. Tighten the three screws of the rotary hook. Note) If the clearance between the needle and the rotary hook is not within 0.2 to 0.4 mm, repeat step 3 and adjust both clearances at needle bar No. 1 and No. 9 (No. 12 for BES-1216AC) to the range of 0.2 to 0.4 mm respectively. 134 BES-916AC • BES-1216AC
-
 1
1 -
2
-
3
-
4
-
5
-
6
-
7
-
8
-
9
-
10
-
11
-
12
-
13
-
14
-
15
-
16
-
17
-
18
-
19
-
20
-
21
-
22
-
23
-
24
-
25
-
26
-
27
-
28
-
29
-
30
-
31
-
32
-
33
-
34
-
35
-
36
-
37
-
38
-
39
-
40
-
41
-
42
-
43
-
44
-
45
-
46
-
47
-
48
-
49
-
50
-
51
-
52
-
53
-
54
-
55
-
56
-
57
-
58
-
59
-
60
-
61
-
62
-
63
-
64
-
65
-
66
-
67
-
68
-
69
-
70
-
71
-
72
-
73
-
74
-
75
-
76
-
77
-
78
-
79
-
80
-
81
-
82
-
83
-
84
-
85
-
86
-
87
-
88
-
89
-
90
-
91
-
92
-
93
-
94
-
95
-
96
-
97
-
98
-
99
-
100
-
101
-
102
-
103
-
104
-
105
-
106
-
107
-
108
-
109
-
110
-
111
-
112
-
113
-
114
-
115
-
116
-
117
-
118
-
119
-
120
-
121
-
122
-
123
-
124
-
125
-
126
-
127
-
128
-
129
-
130
-
 131
131 -
 132
132 -
 133
133 -
 134
134 -
 135
135 -
 136
136 -
 137
137 -
 138
138 -
 139
139 -
 140
140 -
 141
141 -
142
-
143
-
144
-
145
-
146
-
147
-
148
-
149
-
150
-
151
-
152
-
153
-
154
-
155
-
156
-
157
 |
 |
