Brother International CS-6000/6000b/6000t/6000i Operation Manual - Page 26
Raise the needle by turning the handwheel
 |
View all Brother International CS-6000/6000b/6000t/6000i manuals
Add to My Manuals
Save this manual to your list of manuals |
Page 26 highlights
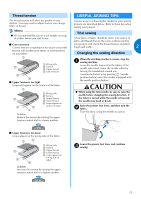
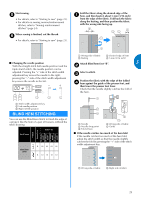
SEWING BASICS On models equipped with a sewing speed f controller, slide the sewing speed controller to the left or right to adjust the sewing speed. Refer to "Sewing speed controller" (page 8). a Sewing speed controller Slowly press down on the foot controller. (With g models equipped with (start/stop button), if the foot controller is not connected, press once.) or Memo ● When the foot controller is plugged in, (start/ stop button) cannot be used to start or stop sewing. ● When sewing is stopped, the needle remains lowered (in the fabric). The machine can be set so that the needle will stay up when sewing is stopped. For details on setting the machine so that the needles stay up when sewing is stopped, refer to "Changing the needle stop position" (page 8). ■ Sewing reinforcement stitches When sewing stitches other than straight or zigzag stitches that are secured with reverse stitching, pressing (reverse/reinforcement stitch button) sews reinforcement stitches, 3 to 5 stitches on top of each other. aStart/stop button The machine starts sewing. Take your foot off the foot controller, or press h (start/stop button) once (if the machine was started by pressing (start/stop button)) (for models equipped with the start/stop button). The machine stops sewing. Raise the needle by turning the handwheel i toward you (counterclockwise) so that the mark on the wheel points up. (With models equipped with (needle position button), raise the needle by pressing once or twice.) Raise the presser foot lever. j Pull the fabric to the left side of the machine, k and then cut the threads by using the thread cutter. a Reverse stitching 1 2 b Reinforcement stitching Memo ● Whether reverse stitches or reinforcement stitches are sewn depends on the stitch that is selected. For details, refer to "Stitch settings" (page 45). a Thread cutter 24
-
 1
1 -
2
-
3
-
4
-
5
-
6
-
7
-
8
-
9
-
10
-
11
-
12
-
13
-
14
-
15
-
16
-
17
-
18
-
19
-
20
-
 21
21 -
 22
22 -
 23
23 -
 24
24 -
 25
25 -
 26
26 -
 27
27 -
 28
28 -
 29
29 -
 30
30 -
 31
31 -
32
-
33
-
34
-
35
-
36
-
37
-
38
-
39
-
40
-
41
-
42
-
43
-
44
-
45
-
46
-
47
-
48
-
49
-
50
-
51
-
52
-
53
-
54
-
55
-
56
-
57
-
58
-
59
-
60
 |
 |