Brother International DCP-7040 Software Users Manual - English - Page 85
Network Scanning (For models with built-in network), Before using Network Scanning, Network license
 |
UPC - 012502620655
View all Brother International DCP-7040 manuals
Add to My Manuals
Save this manual to your list of manuals |
Page 85 highlights
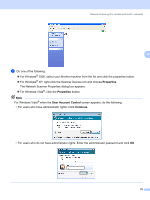
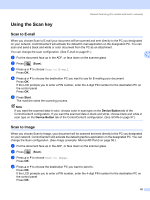
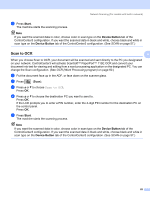
4 Network Scanning (For models with built-in network) 4 To use the machine as a network scanner, the machine must be configured with a TCP/IP address. You can set or change the address settings from the control panel (See Control Panel Setup in the Network User's Guide) or by using the BRAdmin Professional software. If you installed the machine following the instructions for a network user in the Quick Setup Guide then the machine should already be configured for your network. Note • For network scanning, a maximum of 25 clients can be connected to one machine on a network. For example, if 30 clients try to connect at a time, 5 of those clients will not be shown on the LCD. 4 • If your PC is protected by a firewall and is unable to network scan, you may need to configure the firewall settings to allow communication through port number 54925 and 137. See Before using the Brother software on page 110. Before using Network Scanning 4 Network license 4 This product includes a PC license for up to 5 Users. This license supports the installation of the MFL-Pro Software Suite including ScanSoft™ PaperPort™ 11SE on up to 5 PCs on the network. If you want to use more than 5 PCs with ScanSoft™ PaperPort™ 11SE installed, please buy the Brother NL-5 pack which is a multiple PC license agreement pack for up to 5 additional users. To buy the NL-5 pack, contact your Brother dealer. Configuring Network Scanning 4 If you are using a different machine than the one that was originally registered to your PC during the installation of MFL-Pro Suite software (see the Quick Setup Guide), follow the steps below. a For Windows®2000, click the Start button, Control Panel, then Scanners and Cameras. For Windows® XP, click the Start button, Control Panel, Printers and Other Hardware, then Scanners and Cameras (or Control Panel, Scanners and Cameras). For Windows Vista®, click the Start button, Control Panel, Hardware and Sound, then Scanner and Cameras. 78
-
 1
1 -
2
-
3
-
4
-
5
-
6
-
7
-
8
-
9
-
10
-
11
-
12
-
13
-
14
-
15
-
16
-
17
-
18
-
19
-
20
-
21
-
22
-
23
-
24
-
25
-
26
-
27
-
28
-
29
-
30
-
31
-
32
-
33
-
34
-
35
-
36
-
37
-
38
-
39
-
40
-
41
-
42
-
43
-
44
-
45
-
46
-
47
-
48
-
49
-
50
-
51
-
52
-
53
-
54
-
55
-
56
-
57
-
58
-
59
-
60
-
61
-
62
-
63
-
64
-
65
-
66
-
67
-
68
-
69
-
70
-
71
-
72
-
73
-
74
-
75
-
76
-
77
-
78
-
79
-
 80
80 -
 81
81 -
 82
82 -
 83
83 -
 84
84 -
 85
85 -
 86
86 -
 87
87 -
 88
88 -
 89
89 -
 90
90 -
91
-
92
-
93
-
94
-
95
-
96
-
97
-
98
-
99
-
100
-
101
-
102
-
103
-
104
-
105
-
106
-
107
-
108
-
109
-
110
-
111
-
112
-
113
-
114
-
115
-
116
-
117
-
118
-
119
-
120
-
121
-
122
-
123
-
124
-
125
-
126
-
127
-
128
-
129
-
130
-
131
-
132
-
133
-
134
-
135
-
136
-
137
-
138
-
139
-
140
-
141
-
142
-
143
-
144
-
145
-
146
-
147
-
148
-
149
-
150
-
151
-
152
-
153
-
154
-
155
-
156
-
157
-
158
-
159
-
160
-
161
-
162
-
163
-
164
-
165
-
166
-
167
-
168
-
169
-
170
-
171
-
172
-
173
-
174
-
175
-
176
-
177
-
178
-
179
-
180
-
181
-
182
-
183
-
184
-
185
-
186
-
187
-
188
-
189
-
190
-
191
-
192
-
193
-
194
-
195
-
196
-
197
-
198
-
199
 |
 |