Brother International ELS Lettering Users Manual - English - Page 12
Brother International ELS Lettering Manual
 |
View all Brother International ELS Lettering manuals
Add to My Manuals
Save this manual to your list of manuals |
Page 12 highlights
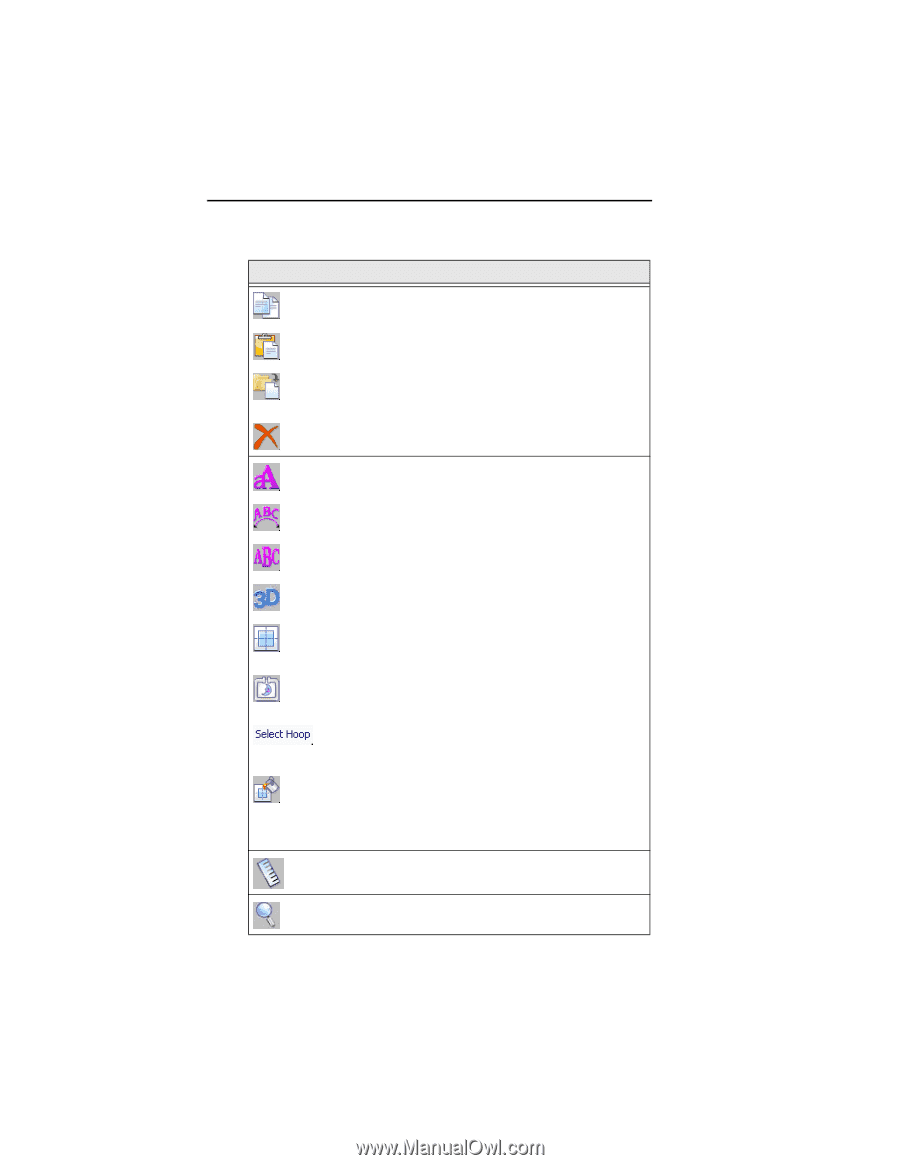
10 Pacesetter Embroidery Lettering Software Instruction Manual Tool What it means Copy: Copies the selection to the clipboard. Paste: Pastes the clipboard contents into the design, at the end of the design sequence. Insert: Pastes a copy of the clipboard selection into the sewing sequence immediately following the selected segment. Delete: Removes the selected segment. Text: Creates lettering placed along a straight baseline. Circle Frame: Creates lettering based on a circular baseline. Monogram Frame: Creates three-letter monogram text. 3D: Realistically renders your design onscreen. Grid: Displays a background grid, which helps with alignment. This grid can be used for the alignment of items on the display. Hoop: Displays the hoop as it fits relative to the embroidery. Clicking this button a second time will turn the view of the hoop off. Select Hoop: Accessed via the drop-down menu from the Hoop tool. Opens up the Select Hoop window, in which you can choose a new hoop. Background: Two options are available from this button, Select Color or Select Fabric. Depending on which one you choose, a dialog box will open in which you select either the color, or the fabric pattern, that appears in the background of the active design window. Ruler: Measures the distance between any two points in a design. Zoom: Magnifies the design to fit a rectangle drawn by the user with the mouse pointer.
-
 1
1 -
2
-
3
-
4
-
5
-
6
-
 7
7 -
 8
8 -
 9
9 -
 10
10 -
 11
11 -
 12
12 -
 13
13 -
 14
14 -
 15
15 -
 16
16 -
 17
17 -
18
-
19
-
20
-
21
-
22
-
23
-
24
-
25
-
26
-
27
-
28
-
29
-
30
-
31
-
32
-
33
-
34
-
35
-
36
-
37
-
38
-
39
-
40
-
41
-
42
-
43
-
44
-
45
-
46
-
47
-
48
-
49
-
50
-
51
-
52
-
53
-
54
-
55
-
56
-
57
-
58
-
59
-
60
-
61
-
62
-
63
-
64
-
65
-
66
-
67
-
68
-
69
-
70
-
71
-
72
-
73
-
74
-
75
-
76
-
77
-
78
-
79
-
80
-
81
-
82
-
83
-
84
-
85
-
86
-
87
-
88
-
89
-
90
-
91
-
92
-
93
-
94
-
95
 |
 |