Brother International HL 4070CDW Quick Setup Guide - English - Page 31
Configuration in Infrastructure mode, Ready, Select, or OK, Machine Info., Wired, TCP/IP, WLAN Enable - reset button
 |
UPC - 012502617808
View all Brother International HL 4070CDW manuals
Add to My Manuals
Save this manual to your list of manuals |
Page 31 highlights
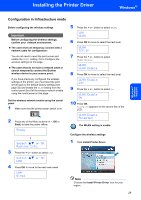
Installing the Printer Driver Windows® Windows® Wireless Network Configuration in Infrastructure mode Before configuring the wireless settings Important Before configuring the wireless settings, confirm your network environment. „ The users that can temporary connect with a network cable for configuration: You do not need to reset the print server and enable the WLAN setting. Go to Configure the wireless settings on this page. „ The users that do not have a network cable or cannot temporarily connect the Brother wireless device to your access point: If you have previously configured the wireless settings of the printer, you must reset the print server back to the default factory settings (see page 52) and enable the WLAN setting from the control panel.See Set the wireless network enable using the contol panel on this page. Set the wireless network enable using the contol panel 1 Make sure that the printer power switch is on. 2 Press any of the Menu buttons (+, -, OK or Back) to take the printer offline. Ready h Select ab or OK Machine Info. 3 Press the + or - button to select LAN. Select ab or OK LAN 4 Press OK to move to the next menu level. LAN Wired 5 Press the + or - button to select WLAN. LAN WLAN 6 Press OK to move to select the next level. WLAN TCP/IP 7 Press the + or - button to select WLAN Enable. WLAN WLAN Enable 8 Press OK to move to select the next level. WLAN Enable Off 9 Press the + or - button to select On. WLAN Enable On 10 Press OK. Accepted appears on the second line of the LCD. WLAN Enable Accepted The WLAN setting is enable. Configure the wireless settings 1 Click Install Printer Driver. Note Choose the Install Printer Driver icon for your region. 29
-
 1
1 -
2
-
3
-
4
-
5
-
6
-
7
-
8
-
9
-
10
-
11
-
12
-
13
-
14
-
15
-
16
-
17
-
18
-
19
-
20
-
21
-
22
-
23
-
24
-
25
-
 26
26 -
 27
27 -
 28
28 -
 29
29 -
 30
30 -
 31
31 -
 32
32 -
 33
33 -
 34
34 -
 35
35 -
 36
36 -
37
-
38
-
39
-
40
-
41
-
42
-
43
-
44
-
45
-
46
-
47
-
48
-
49
-
50
-
51
-
52
-
53
-
54
-
55
-
56
-
57
-
58
 |
 |
