Brother International Innov-is 80 Operation Manual - Page 66
Sewing an even seam, allowance, Sewing hook-and-loop, fastener
 |
View all Brother International Innov-is 80 manuals
Add to My Manuals
Save this manual to your list of manuals |
Page 66 highlights
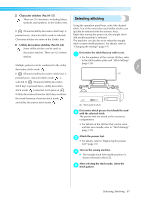
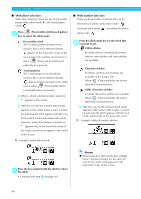
SEWING BASICS Sewing an even seam allowance To sew an even seam, start sewing so that the seam allowance is to the right of the presser foot, and the edge of the fabric is aligned with either the right edge of the presser foot or a marking on the needle plate. ■ Aligning the fabric with the presser foot Sew while keeping the right edge of the presser foot a fixed distance from the edge of the fabric. 1 2 a Seam b Presser foot ■ Aligning the fabric with a needle plate marking The markings on the needle plate show the distance from the needle position of a seam sewn with the straight stitch (left needle position). Sew while keeping the edge of the fabric aligned with a marking in the needle plate. The distance between the markings in the upper scale is 1/8 inch (3 mm) and the distance between the markings in the grid is 5 mm (3/16 inch). 5 1 4 Sewing hook-and-loop fastener CAUTION ● Use only the ungummed hook-and-loop fastener which is for sewing. If the glue is attached to the needle or the bobbin hook race, it may cause malfunction. ● If the hook-and-loop fastener is sewn with the thin needle (65/9-75/11), the needle may bend or break. Note z Before start sewing, baste together the fabric and the hook-and-loop fastener. Make sure that the needle passes through the hookand-loop fastener by turning the handwheel and lower the needle into the hook-and-loop fastener before sewing. And then, sew the edge of the hookand-loop fastener at a slow speed. If the needle does not pass through the hook-andloop fastener, replace the needle with the needle for thick fabrics (page 38). 2 6 3 a Edge of the hook-and-loop fastener a Seam b Presser foot c Centimeters d Inches e Needle plate f 16 mm (5/8 inch) 64
-
 1
1 -
2
-
3
-
4
-
5
-
6
-
7
-
8
-
9
-
10
-
11
-
12
-
13
-
14
-
15
-
16
-
17
-
18
-
19
-
20
-
21
-
22
-
23
-
24
-
25
-
26
-
27
-
28
-
29
-
30
-
31
-
32
-
33
-
34
-
35
-
36
-
37
-
38
-
39
-
40
-
41
-
42
-
43
-
44
-
45
-
46
-
47
-
48
-
49
-
50
-
51
-
52
-
53
-
54
-
55
-
56
-
57
-
58
-
59
-
60
-
 61
61 -
 62
62 -
 63
63 -
 64
64 -
 65
65 -
 66
66 -
 67
67 -
 68
68 -
 69
69 -
 70
70 -
 71
71 -
72
-
73
-
74
-
75
-
76
-
77
-
78
-
79
-
80
-
81
-
82
-
83
-
84
-
85
-
86
-
87
-
88
-
89
-
90
-
91
-
92
-
93
-
94
-
95
-
96
-
97
-
98
-
99
-
100
-
101
-
102
-
103
-
104
-
105
-
106
-
107
-
108
-
109
-
110
-
111
-
112
-
113
-
114
-
115
-
116
-
117
-
118
-
119
-
120
-
121
-
122
-
123
-
124
-
125
-
126
-
127
-
128
-
129
-
130
-
131
-
132
-
133
-
134
-
135
-
136
-
137
-
138
-
139
-
140
-
141
-
142
-
143
-
144
-
145
-
146
-
147
-
148
-
149
-
150
-
151
-
152
 |
 |
