Brother International Innov-is BQ950 Operation Manual - Page 99
Attaching Patches or Emblems to Shirt Sleeves
 |
View all Brother International Innov-is BQ950 manuals
Add to My Manuals
Save this manual to your list of manuals |
Page 99 highlights
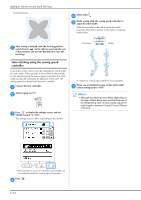
Attaching Patches or Emblems to Shirt Sleeves Attaching Patches or Emblems to Shirt Sleeves Use these stitch patterns to attach patches or emblems to pant legs, shirt sleeves, etc. • Using the table below, refer to "Using the utility stitch tables in the "Sewing" section" in the "Basic operations" section. Stitch name Stitch Lower the needle into the fabric at the beginning of the d stitching, and then start sewing. Lower the needle at the upper-right corner. S Model 4 Model 3, 2 Model 1 Presser foot UTILITY STITCHES Reverse (Straight stitch) Sideways to left (Straight stitch) Sideways to right (Straight stitch) Forward (Straight stitch) Sideways to left (Zigzag stitch) Sideways to right (Zigzag stitch) Forward (Zigzag stitch) Reverse (Zigzag stitch) Stitch number 5-01 92 - 5-02 93 - 5-03 94 - 5-04 95 5-05 96 - N - 5-06 97 - 5-07 98 - 5-08 99 - Insert the tubular piece of fabric onto the free-arm, and then sew in the order shown in the illustration. 4 3 1 2 Remove the flat bed attachment. a Attach monogramming foot "N". b → The fabric is fed toward the back of the machine, as usual. After you have sewn to the corner, stop the machine, e and then select stitch . Start sewing. f → The fabric is fed to the right. After you have sewn to the corner, stop the machine, g and then select stitch . Start sewing. h → The fabric is fed forward. After you have sewn to the corner, stop the machine, i and then select stitch . Start sewing. j Select stitch . c → The fabric is fed to the left. Sewing S-39
-
 1
1 -
2
-
3
-
4
-
5
-
6
-
7
-
8
-
9
-
10
-
11
-
12
-
13
-
14
-
15
-
16
-
17
-
18
-
19
-
20
-
21
-
22
-
23
-
24
-
25
-
26
-
27
-
28
-
29
-
30
-
31
-
32
-
33
-
34
-
35
-
36
-
37
-
38
-
39
-
40
-
41
-
42
-
43
-
44
-
45
-
46
-
47
-
48
-
49
-
50
-
51
-
52
-
53
-
54
-
55
-
56
-
57
-
58
-
59
-
60
-
61
-
62
-
63
-
64
-
65
-
66
-
67
-
68
-
69
-
70
-
71
-
72
-
73
-
74
-
75
-
76
-
77
-
78
-
79
-
80
-
81
-
82
-
83
-
84
-
85
-
86
-
87
-
88
-
89
-
90
-
91
-
92
-
93
-
 94
94 -
 95
95 -
 96
96 -
 97
97 -
 98
98 -
 99
99 -
 100
100 -
 101
101 -
 102
102 -
 103
103 -
 104
104 -
105
-
106
-
107
-
108
-
109
-
110
-
111
-
112
-
113
-
114
-
115
-
116
-
117
-
118
-
119
-
120
-
121
-
122
-
123
-
124
-
125
-
126
-
127
-
128
-
129
-
130
-
131
-
132
-
133
-
134
-
135
-
136
-
137
-
138
-
139
-
140
-
141
-
142
-
143
-
144
 |
 |
