Brother International PE-200 Users Manual - English - Page 67
Mechanical problems, embroidery frame travels a lot during embroidery. - needle bar
 |
View all Brother International PE-200 manuals
Add to My Manuals
Save this manual to your list of manuals |
Page 67 highlights
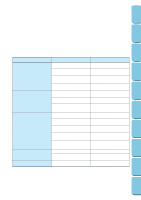
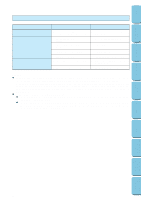
CONTENTS MACHINE KNOWLEDGE EMBROIDERING MAINTENANCE Mechanical problems Symptom 1. Machine operation is slow and noisy 2. The machine does not start 3. The needle breaks Probable cause 1. Thread scraps and dust have accumulated under the needle plate. 1. The "START/STOP" button is not pressed. 2. The main power switch is in the off position. 3. The presser foot is not lowered. 4. Check Error messages. 1. The needle is not correctly inserted. 2. The correct needle is not used. Remedy 1. Remove the thread scraps and dust with a brush. 1. Press the "START/STOP" button. 2. Turn the power on. 3. Lower the presser foot. 4. See "ERROR MESSAGE" on page 59. 1. Remove the needle and reset a new needle properly. 2. Change to the proper needle. Caution ● This machine is equipped with a thread breakage sensor. Accordingly, if the upper thread is not threaded, the machine will not operate even if the "START/STOP" button is pressed. In addition, a loud noise which is different from the normal operation noise is generated by the needle bar holding mechanism during layout changes, layout change tests and also when the embroidery frame travels a lot during embroidery. This sound is normal and is not the result of a malfunction. ● If the power goes off during embroidering: ● Turn the power off and unplug the machine. Damage may occur if the machine is on when the power comes back on. ● To start again, while the main power switch is off, plug the unit in. Then turn the main power switch on and select an operation. Refer to page 54, using the "HELP" function to get back to the point where the machine went off. ERROR MESSAGE TROUBLESHOOTING PATTERNS EMBROIDERING USING A SMALL FRAME (OPTIONAL) EMBROIDERING USING A EXTRA-SMALL FRAME (OPTIONAL) EMBROIDERING USING A LARGE FRAME (OPTIONAL) 64
-
 1
1 -
2
-
3
-
4
-
5
-
6
-
7
-
8
-
9
-
10
-
11
-
12
-
13
-
14
-
15
-
16
-
17
-
18
-
19
-
20
-
21
-
22
-
23
-
24
-
25
-
26
-
27
-
28
-
29
-
30
-
31
-
32
-
33
-
34
-
35
-
36
-
37
-
38
-
39
-
40
-
41
-
42
-
43
-
44
-
45
-
46
-
47
-
48
-
49
-
50
-
51
-
52
-
53
-
54
-
55
-
56
-
57
-
58
-
59
-
60
-
61
-
 62
62 -
 63
63 -
 64
64 -
 65
65 -
 66
66 -
 67
67 -
 68
68 -
 69
69 -
 70
70 -
 71
71 -
 72
72 -
73
-
74
-
75
-
76
-
77
-
78
-
79
-
80
-
81
-
82
-
83
-
84
-
85
-
86
-
87
-
88
-
89
-
90
-
91
-
92
-
93
-
94
-
95
-
96
-
97
-
98
-
99
-
100
-
101
-
102
-
103
-
104
-
105
-
106
-
107
-
108
-
109
-
110
-
111
-
112
-
113
-
114
-
115
-
116
-
117
-
118
-
119
-
120
-
121
-
122
-
123
-
124
-
125
-
126
-
127
-
128
-
129
-
130
-
131
-
132
-
133
-
134
-
135
-
136
-
137
-
138
-
139
-
140
-
141
-
142
-
143
-
144
-
145
-
146
 |
 |