| Section |
Page |
| Getting Started |
2 |
| For Your Information |
2 |
| Brother® 90 Days/One Year Limited Warranty and Replacement Service (For USA Only) |
4 |
| Important Information |
6 |
| GENERAL DESCRIPTION |
8 |
| TOP VIEW |
8 |
| BOTTOM VIEW |
8 |
| KEYBOARD & LCD DISPLAY |
9 |
| GENERAL PRECAUTIONS |
10 |
| BATTERIES |
10 |
| 1 Remove the battery compartment cover on the back of the machine. |
10 |
| 2 If batteries are already installed, remove them. |
11 |
| 3 Insert eight new AA alkaline batteries, making sure that their poles point in the correct direc... |
11 |
| 4 Attach the battery compartment cover. |
11 |
| OPTIONAL AC ADAPTER |
11 |
| 1 Insert the plug on the adapter cord into the connector marked DC IN 9.5V on the right side of t... |
11 |
| 2 Insert the plug on the adapter into the nearest standard electrical outlet. |
11 |
| TAPE CASSETTE |
12 |
| 1 Lift open the tape compartment cover. The installed cassette is also released. |
12 |
| 2 If a tape cassette is already installed, remove it by pulling it straight up. |
12 |
| 3 If the ink ribbon in the tape cassette to be installed is loose, use your finger to wind the to... |
12 |
| 4 Insert the tape cassette firmly into the tape compartment, making sure that the entire back of ... |
12 |
| 5 Close the compartment cover, and then turn on the machine, if it is off. |
12 |
| 6 Hold down c and press r once to advance the tape and remove any slack (for TZ tape only). |
12 |
| CONNECTING THE P-TOUCH TO A COMPUTER |
13 |
| 1 Insert the flat (A) connector on the USB cable into the USB port on the computer. |
13 |
| 2 Insert the square (B) connector on the USB cable into the USB port on the right side of the P-t... |
13 |
| 3 Turn on the P-touch. |
13 |
| INSTALLING THE SOFTWARE AND PRINTER DRIVER |
14 |
| On an IBM PC-Compatible Computer |
14 |
| 1 Insert the enclosed CD-ROM into the computer’s CD-ROM drive. A dialog box automatically appears... |
15 |
| 2 Click the upper button (P-touch Editor). The InstallShield® Wizard for installing the P-touch E... |
15 |
| 3 Carefully read the contents of the Welcome dialog box, and then click the Next button to contin... |
16 |
| 4 Type the necessary information into the appropriate boxes (If the information has already been ... |
16 |
| 5 Click the Yes button to register the entered information. |
16 |
| The Setup Type dialog box appears. |
16 |
| 6 Select the installation method, and then click the Next button. |
17 |
| 7 After P-touch Editor is installed, a dialog box appears, allowing you to select whether or not ... |
17 |
| To install the printer driver, click the Yes button. |
18 |
| 1 Insert the enclosed CD-ROM into the computer’s CD-ROM drive. A dialog box automatically appears... |
19 |
| 2 Click the middle button (P-touch Quick Editor). The InstallShield® Wizard for installing the P�... |
19 |
| 3 Carefully read the contents of the Welcome dialog box, and then click the Next button to contin... |
20 |
| 4 Type the necessary information into the appropriate boxes (If the information has already been ... |
20 |
| 5 Click the Yes button to register the entered information. |
20 |
| The Choose Destination Location dialog box appears. |
20 |
| 6 Click the Next button to begin installation. |
21 |
| After P-touch Quick Editor is installed, a dialog box appears, allowing you to select where short... |
21 |
| 7 Select the desired locations for the shortcuts, and then click the Next button. A dialog box ap... |
21 |
| To install the printer driver, click the Yes button. |
21 |
| The first Driver Setup dialog box appears, informing you that the PT-2600/2610 printer driver wil... |
21 |
| 1 Insert the enclosed CD-ROM into the computer’s CD-ROM drive. A dialog box automatically appears... |
22 |
| 2 Click the third button from the top (P-touch AV Editor). The InstallShield® Wizard for installi... |
22 |
| 3 Carefully read the contents of the Welcome dialog box, and then click the Next button to contin... |
23 |
| 4 Type the necessary information into the appropriate boxes (If the information has already been ... |
23 |
| 5 Click the Yes button to register the entered information. |
23 |
| The Choose Destination Location dialog box appears. |
23 |
| 6 Click the Next button to begin installation. |
23 |
| After P-touch AV Editor is installed, a dialog box appears, allowing you to select where shortcut... |
23 |
| 7 Select the desired locations for the shortcuts, and then click the Next button. A dialog box ap... |
23 |
| To install the printer driver, click the Yes button. |
24 |
| 1 In the dialog box that appears, informing you that the PT-2600/2610 printer driver will be inst... |
25 |
| 2 Connect the P-touch 2600/2610 to the computer using the enclosed USB interface cable as describ... |
25 |
| 3 Click the Finish button. A dialog box appears, indicating that the installation is finished. |
25 |
| 4 Select “Yes, I want to restart my computer now.”, click the Finish button to restart the comput... |
25 |
| 1 In the dialog box that appears, informing you that the PT-2600/2610 printer driver will be inst... |
25 |
| 2 Connect the P-touch 2600/2610 to the computer using the enclosed USB interface cable as describ... |
26 |
| 3 Select “Install the software automatically (Recommended)”, and then click the Next button. A di... |
26 |
| 4 Click the Continue Anyway button to continue with the installation. A Found New Hardware Wizard... |
26 |
| 5 Click the Finish button. A Driver Setup dialog box appears, indicating that the printer driver ... |
26 |
| 6 Click the Finish button. A dialog box appears, indicating that the installation is finished. |
27 |
| 7 Select “Yes, I want to restart my computer now.” (or “Yes, restart immediately” if the printer ... |
27 |
| 1 Turn off the P-touch 2600/2610, and then disconnect it from the computer. |
27 |
| 2 Insert the enclosed CD-ROM into the computer’s CD-ROM drive. A dialog box automatically appears... |
27 |
| 3 Click the lower button (Driver). |
27 |
| A Driver Setup dialog box appears, allowing you to select whether to replace, add or delete the P... |
27 |
| 4 Select either “Replace with new Brother PT�2600/2610.” or “Add Brother PT�2600/ 2610.”, and the... |
27 |
| 5 A dialog box appears, instructing you to connect the P-touch 2600/2610 to the computer. |
28 |
| 6 Connect the P-touch 2600/2610 to the computer using a USB interface cable as described on page�... |
28 |
| 7 Click the Finish button. |
28 |
| 5 A dialog box appears, instructing you to connect the P-touch 2600/2610 to the computer. |
28 |
| 6 Connect the P-touch 2600/2610 to the computer using the enclosed USB interface cable as describ... |
29 |
| 7 Select “Install the software automatically (Recommended)”, and then click the Next button. A di... |
29 |
| 8 Click the Continue Anyway button to continue with the installation. A Found New Hardware Wizard... |
29 |
| 9 Click the Finish button. A Driver Setup dialog box appears, indicating that the printer driver ... |
29 |
| 0 Select “Yes, restart immediately.”, click the Finish button to restart the computer, and then r... |
29 |
| On a Macintosh Computer |
30 |
| 1 With the P-touch 2600/2610 and the Macintosh turned off, connect the P-touch to the computer us... |
30 |
| 2 Turn on the Macintosh. |
30 |
| 3 Insert the enclosed CD-ROM into the computer’s CD-ROM drive. |
30 |
| 4 Double-click the Mac OS 9 folder to open it. |
30 |
| 5 Double-click the P-touch Editor 3.2 folder to open it. |
31 |
| 6 Double-click the P-touch Editor 3.2 Installer icon in the folder that appears. The installer st... |
31 |
| 7 Select the installation method. |
31 |
| 8 When the dialog box appears, indicating that the installation is finished, click the Quit button. |
31 |
| 9 When the dialog box appears, asking if you wish to restart the computer, click the Restart butt... |
32 |
| 1 With the P-touch 2600/2610 and the Macintosh turned off, connect the P-touch to the computer us... |
32 |
| 2 Turn on the Macintosh. |
32 |
| 3 Insert the enclosed CD-ROM into the computer’s CD-ROM drive. |
32 |
| 4 Double-click the Mac OS X folder to open it. |
32 |
| 5 Double-click the P-touch Editor 3.2 folder to open it. |
32 |
| 6 Double-click the P-touch Editor 3.2 Installer icon in the folder that appears. The installer st... |
32 |
| 7 Click the Next button. The Choose Product Components dialog box appears. |
33 |
| 8 Select the installation method. |
33 |
| The Choose Alias Folder dialog box appears, allowing you to select where an alias to P-touch Edit... |
33 |
| 9 Select the desired location for the alias, and then click the Next button. A dialog box appears... |
34 |
| 0 Check that the installation will be performed as desired, and then click the Install button. Af... |
34 |
| A Click the Done button, and then restart the computer. |
34 |
| 1 With the P-touch 2600/2610 and the Macintosh turned off, connect the P-touch to the computer us... |
34 |
| 2 Turn on the Macintosh. |
34 |
| 3 Insert the enclosed CD-ROM into the computer’s CD-ROM drive. |
34 |
| 4 Double-click the Mac OS 9 folder to open it. |
35 |
| 5 Double-click the P-touch Quick Editor Installer icon in the folder that appears. The installer ... |
35 |
| 6 Select the installation method. |
35 |
| 7 When the dialog box appears, indicating that the installation is finished, click the Quit button. |
35 |
| 8 When the dialog box appears, asking if you wish to restart the computer, click the Restart butt... |
35 |
| 1 With the P-touch 2600/2610 and the Macintosh turned off, connect the P-touch to the computer us... |
36 |
| 2 Turn on the Macintosh. |
36 |
| 3 Insert the enclosed CD-ROM into the computer’s CD-ROM drive. |
36 |
| 4 Double-click the Mac OS X folder to open it. |
36 |
| 5 Double-click the P-touch Quick Editor folder to open it. |
36 |
| 6 Double-click the Quick Editor Installer icon in the folder that appears. The installer starts u... |
36 |
| 7 Click the Next button. The Choose Alias Folder dialog box appears, allowing you to select where... |
37 |
| 8 Select the desired location for the alias, and then click the Next button. A dialog box appears... |
37 |
| 9 Check that the installation will be performed as desired, and then click the Install button. Af... |
37 |
| 0 Click the Done button, and then restart the computer. |
37 |
| 1 With the P-touch 2600/2610 and the Macintosh turned off, connect the P-touch to the computer us... |
37 |
| 2 Turn on the Macintosh. |
37 |
| 3 Insert the enclosed CD-ROM into the computer’s CD-ROM drive. |
38 |
| 4 Double-click the Mac OS X folder to open it. |
38 |
| 5 Double-click the Driver Installer icon in the folder that appears. The installer starts up, and... |
38 |
| 6 Click the Next button. A dialog box appears, allowing you to check the installation. |
38 |
| 7 Check that the installation will be performed as desired, and then click the Install button. Af... |
39 |
| 8 Click the Done button, and then restart the computer. |
39 |
| 1 Turn on the P-touch 2600/2610. |
39 |
| 2 Pull down the Apple menu and select “Chooser” to display the Chooser window. |
39 |
| 3 In the list on the left, click the PT�2600/ 2610 icon. Then, select the appropriate printer fro... |
39 |
| 4 Close the Chooser window to confirm your settings. |
39 |
| 1 Turn on the P-touch 2600/2610. |
39 |
| 2 Double-click the Applications folder on the Macintosh HD to open it. |
39 |
| 3 Double-click the Utilities folder to open it. |
39 |
| 4 Double-click “Print Center” to start it up. |
39 |
| 5 Click the Add Printer button. A list of detected USB printers appears. |
40 |
| 6 Select “PT-2600/2610” from the USB list, and then click the Add button. The PT-2600 appears in ... |
40 |
| 7 Quit Print Center. |
40 |
| READING THE USER’S GUIDE |
40 |
| On an IBM PC-Compatible Computer |
40 |
| 1 Start up Windows® Explorer. |
40 |
| 2 Select the CD-ROM drive. |
40 |
| 3 Double-click the Ptouch folder |
40 |
| 4 Double-click the Manual folder |
40 |
| 5 Double-click “Main.htm”. |
40 |
| 1 Click the Start button in the taskbar to display the Start menu. |
40 |
| 2 Point to “Programs”. |
40 |
| 3 Point to “P-touch Editor 3.2”. |
40 |
| 4 Click “The User’s Guide P-touch Editor 3.2”. |
40 |
| On a Macintosh Computer |
40 |
| USING P-TOUCH EDITOR 3.2 |
41 |
| 1 Click the Start button in the taskbar to display the Start menu. |
41 |
| 2 Select “Programs”. |
41 |
| 3 Select “P-touch Editor 3.2”. |
41 |
| 4 Click “P-touch Editor 3.2”. |
41 |
| 1 Start up Windows® Explorer. |
41 |
| 2 Select the drive and directory where P-touch Editor is installed. |
41 |
| 3 Double-click “Ptedit3.exe”. |
41 |
| 1 Click (Text button) on the draw toolbar. Text can be typed in, and the pointer changes from (se... |
43 |
| 2 Move the I-beam pointer to the position in the layout area where you wish to type in text, and ... |
43 |
| 3 The cursor flashes in the layout area to indicate that you can now type in text. |
43 |
| 4 Use the computer keyboard to type in the text. |
43 |
| 5 To create a new line of text, press the keyboard’s Enter key. |
44 |
| USING THE P-TOUCH QUICK EDITOR |
44 |
| 1 Click the Start button in the taskbar to display the Start menu. |
45 |
| 2 Select “Programs”. |
45 |
| 3 Click “P-touch Quick Editor”. |
45 |
| 1 Click the arrow beside the Properties button to display a drop-down menu. |
46 |
| 2 Click [Tape Settings] to display various label format settings. |
46 |
| 3 In the Format list, click the desired label format. |
46 |
| 1 Click the arrow beside the Properties button to display a drop-down menu. |
46 |
| 2 Click [Text Settings] to display various text format settings. |
46 |
| 3 In the Text Settings Properties, select the desired text formats. |
46 |
| 4 Click in the label view, and then type or import the text. |
46 |
| 1 Select the desired text in the other application. |
47 |
| 2 Import the text into the label layout either by pressing the designated shortcut keys (Windows®... |
47 |
| 1 Click the Text History button to display the Text History list. |
47 |
| 2 Click the desired text. |
47 |
| 1 Windows®: Right-click in the label view (or text box), select [Symbols] in the menu that appear... |
47 |
| Macintosh: Hold down the Control key and click in the label view (or text box), select [Symbol fo... |
47 |
| 2 In the Symbol Font list, select the desired symbol font. |
47 |
| 3 In the Symbol List view, select the desired symbol. |
47 |
| 4 Click the OK button. The selected symbol is added at the left of the text. |
47 |
| Macintosh: Hold down the Control key and click in the label view (or text box), select [Backgroun... |
47 |
| 1 Click the arrow beside the Print button to display a drop-down menu. |
48 |
| 2 Click [Print Options]. The Print dialog box appears. |
48 |
| 3 Select the desired print settings. |
48 |
| Auto Cut: This option allows you to select whether or not to automatically cut off the label afte... |
48 |
| Mirror Printing: This option allows you to print the text in reverse so it’s perfect for attachin... |
48 |
| Copies: This option allows you to enter the number of copies to be printed. |
48 |
| 4 Windows®: Click the OK button to start printing. |
48 |
| Macintosh: Click the Print button. The layout is printed. |
48 |
| USING THE P-TOUCH AV EDITOR |
49 |
| 1 Click the Start button in the taskbar to display the Start menu. |
49 |
| 2 Select “Programs”. |
49 |
| 3 Click “P-touch AV Editor”. |
49 |
| 1 Click(Symbol button). The Input Symbol dialog box appears. |
50 |
| 2 In the Symbol Font list, select the desired symbol font. |
50 |
| 3 In the Symbol List view, select the desired symbol. |
50 |
| 4 Click the OK button. The selected symbol is added to the left of the text. |
50 |
| 1 Click the arrow beside(Print button) to display a drop-down menu. |
51 |
| 2 Click [Print Options]. The Print dialog box appears. |
51 |
| 3 Select the desired print settings. |
51 |
| 4 Click the OK button to start printing. |
51 |
| UNINSTALLING THE SOFTWARE & PRINTER DRIVER |
52 |
| On an IBM PC-Compatible Computer |
52 |
| 1 Start up Windows® 98, 98 SE, Me, 2000 or XP. |
52 |
| 2 Click the Start button in the taskbar, select “Settings”, and then click “Control Panel”. With ... |
52 |
| 3 In the Control Panel window, double-click “Add/Remove Programs” (“Add or Remove Programs” in Wi... |
52 |
| 4 In the Add/Remove Programs Properties dialog box, select “P-touch Editor 3.2” (to delete the P-... |
52 |
| 5 A message appears, asking if you wish to delete the selected application. Click the Yes button ... |
52 |
| 6 In the dialog box that appears, indicating that the application is deleted, click the OK button. |
52 |
| 1 Turn off the P-touch 2600/2610, and then disconnect it from the computer. |
52 |
| 2 Insert the enclosed CD-ROM into the computer’s CD-ROM drive. A dialog box automatically appears... |
52 |
| 3 Click the lower button (Driver). |
53 |
| A Driver Setup dialog box appears, allowing you to select whether to replace, add or delete the P... |
53 |
| 4 Select “Delete Brother PT-2600/2610.”, and then click the Next button. A dialog box appears, as... |
53 |
| 5 Click the Yes button. A dialog box appears, indicating that the printer drivers have been deleted. |
53 |
| 6 Click the Finish button. |
53 |
| On a Macintosh Computer |
53 |
| 1 Drag the following to the Trash icon: |
53 |
| 2 In the System Folder, open the Extensions folder. |
53 |
| 3 Drag the following to the Trash icon: |
54 |
| 4 In the System Folder, open the Preferences folder. |
54 |
| 5 Drag the following to the Trash icon. |
54 |
| 1 Double-click the Applications folder on the Macintosh HD to open it. |
54 |
| 2 Double-click the P-touch Editor 3.2 folder to open it. |
54 |
| 3 Double-click the Uninstall P-touch folder. |
54 |
| 4 Double-click the Uninstall P-touch icon in the folder that appears. The uninstaller starts up. |
54 |
| 5 Click the Uninstall button. After P-touch Editor 3.2 is removed, a dialog box appears, indicati... |
54 |
| 6 Click the Quit button. |
54 |
| 1 Double-click the Applications folder on the Macintosh HD to open it. |
54 |
| 2 Double-click the P-touch Quick Editor folder to open it. |
54 |
| 3 Double-click the Uninstall P-touch folder. |
54 |
| 4 Double-click the Uninstall P-touch icon in the folder that appears. The uninstaller starts up. |
54 |
| 5 Click the Uninstall button. After P-touch Quick Editor is removed, a dialog box appears, indica... |
54 |
| 6 Click the Quit button. |
54 |
| ATTACHING LABELS |
55 |
| 1 Hold the tape in your left hand, with the printed surface facing up, and hold the stick in your... |
55 |
| 2 Pass the tape halfway through the long narrow hole in the stick. |
55 |
| 3 Turn the stick three-quarters of a turn towards you and pull the stick away from you as shown b... |
55 |
| 4 Peel off the label backing. |
55 |
| PRINT HEAD & ROLLERS |
56 |
| 1 Turn off the machine, and then disconnect the AC adapter and remove the batteries. |
56 |
| 2 Open the tape compartment cover, and then remove the tape cassette if one is installed. The pri... |
56 |
| 3 Print head: Use a dry cotton swab to gently wipe the print head with an up-and-down motion. Rol... |
56 |
| 4 Install a tape cassette, close the tape compartment cover, and then try printing again. |
56 |
| 5 If a white streak still appears in the label, repeat steps 3 and 4 using a cotton swab dipped i... |
56 |
| POWER KEY |
57 |
| CURSOR KEYS |
57 |
| CODE, ALT & SHIFT KEYS |
58 |
| 1 Hold down c and press s. The Caps indicator on the left side of the display comes on. |
60 |
| 2 Press the keys of the desired letters or symbols. |
60 |
| 3 To exit Caps mode, hold down c and press s. The Caps indicator goes off. |
60 |
| SPACE KEY |
61 |
| RETURN KEY |
61 |
| NEW BLOCK KEY |
63 |
| TAB FUNCTION |
64 |
| 1 Hold down c and press W once. The current tab length is displayed. |
64 |
| 2 Press e or h until the desired length is displayed or use the number keys to type in the length. |
64 |
| 3 Press _. |
64 |
| 1 Hold down c and press W once. |
65 |
| 2 Press h until 1.0 is displayed. |
65 |
| 3 Press _. |
65 |
| DELETE KEY |
66 |
| 1 Press f, w, e or h to position the cursor below the character immediately to the right of the c... |
66 |
| 2 Press * once. |
66 |
| 1 Press f, w, e or h to position the cursor below the character immediately to the right of the l... |
66 |
| 2 Hold down * until all of the characters that you wish to delete are deleted. |
66 |
| LINE OUT FUNCTION |
66 |
| 1 Press f, w, e or h to position the cursor within the line of text that you wish to delete. |
66 |
| 2 Hold down c and press P once. |
67 |
| CLEAR FUNCTION |
67 |
| 1 Hold down c and press *. |
67 |
| 2 Press e or h until TXT&FORMAT is selected (flashing). |
67 |
| 3 Press _. |
67 |
| 1 Hold down c and press *. |
68 |
| 2 Press e until TXT&FORMAT is flashing. |
68 |
| 3 Press _. |
68 |
| 1 Hold down c and press *. |
68 |
| 2 Press e or h until TEXT ONLY is selected (flashing). |
68 |
| 3 Press _. |
68 |
| 1 Hold down c and press *. |
69 |
| 2 Press h until TEXT ONLY is flashing. |
69 |
| 3 Press _. |
69 |
| ACCENT FUNCTION |
69 |
| 1 Hold down c and press A. The message “ACCENT a – u / A – U?” appears on the display. |
70 |
| 2 Press the key of the letter in the desired accented character. |
70 |
| 3 Press f or w until the desired accented character appears enlarged within the frame in the midd... |
70 |
| 4 Press _. The accented character is added to the text. |
70 |
| 1 Hold down c and press A. |
70 |
| 2 Hold down s and press E. |
70 |
| 3 Press w until É appears in the frame. |
71 |
| 4 Press _. |
71 |
| SYMBOL FUNCTION |
71 |
| 1 Hold down c and press a. A row of symbols appears in the display. |
72 |
| 2 Press e or h to display different rows of symbols and press f or w until the desired symbol app... |
72 |
| 3 Press _. The symbol is added to the text. |
72 |
| 1 Hold down c and press a. |
72 |
| 2 Press e or h until the row containing “” appears, and then press f or w until “” appears in the... |
72 |
| 3 Press _. |
72 |
| AUTO FORMAT FUNCTION |
73 |
| 1 Press ior jonce. The A/F indicator comes on. |
73 |
| 2 Press e or h until the name of the desired layout appears. |
73 |
| 3 Press _. The first field for the selected layout appears in the display. |
73 |
| 4 For each field, type in the text, and then press _. When _ is pressed after typing in the text ... |
73 |
| 5 Press e or h until the CHNGE STL? command is displayed. |
73 |
| 6 Press _. |
73 |
| 7 Press e or h to select the desired character style. |
74 |
| 8 Press _. “MENU” appears in the display. |
74 |
| 9 Press e or h until the PRINT command is displayed. |
74 |
| 0 Press _ to print the label, and have machine automatically cut it off. The message “COPIES 1/�1... |
74 |
| A Press e or h until the EDIT MORE command is displayed. |
74 |
| B Press _. The first field for the selected layout appears in the display. |
74 |
| C Repeat step 4 until the text is edited as you wish. The MENU appears again when _ is pressed af... |
74 |
| D Press e or h until the EXIT command is displayed. |
74 |
| E Press _. The message “EXIT AUTO FORMAT?” appears in the display. |
74 |
| F Press _. The Auto Format function is exited, and the text that was displayed before the Auto Fo... |
74 |
| 1 Press j. |
74 |
| 2 Press e or h until layout 35 (FILE SHORT) is displayed. |
75 |
| 3 Press _. |
75 |
| 4 Type in “August Sales Report”, and then press _. |
75 |
| 5 Press e or h until CHNGE STL? is displayed. |
75 |
| 6 Press _. |
75 |
| 7 Press e or h until ELEGANT is displayed. |
75 |
| 8 Press _. |
75 |
| 9 Make sure that PRINT is displayed, and then press _. |
76 |
| 1 Press i. |
76 |
| 2 Press e or h until layout 4 (ADDRES4) is displayed. |
76 |
| 3 Press _. |
76 |
| 4 Type in “Mr. R. Becker”, and then press _. |
76 |
| 5 Type in “29 South Main St.”, and then press _. |
76 |
| 6 Type in “Los Angeles, CA 88888”, and then press _. |
77 |
| 7 Press e or h until CHNGE STL? is displayed. |
77 |
| 8 Press _. |
77 |
| 9 Press e or h until FORMAL is displayed. |
77 |
| 0 Press _. |
77 |
| A Make sure that PRINT is displayed, and then press _. |
77 |
| STAMP FUNCTION |
85 |
| 1 Type in the text, and then insert a medium (3/4” (18 mm)-wide) or large (1” (24 mm)- wide) stam... |
85 |
| 2 Hold down c and press U once. The message “STAMP FORMAT?” appears in the display. |
85 |
| 3 Press _. The text is automatically formatted for the installed stamp: centered within the prese... |
85 |
| 4 Press p to cut the text out of the stamp stencil film. |
85 |
| 5 After the stamp stencil film is cut off, remove the backing paper from the stamp stencil film a... |
85 |
| 1 Enter the text and insert a stamp film cassette in the tape compartment. |
86 |
| 2 Hold down c and press U. |
86 |
| 3 Press _. |
86 |
| 4 Press p to engrave the stamp stencil film, and then automatically cut it off. |
86 |
| 5 Remove the stamp frame from around the stamp film holder ink pad, one side at a time, and then ... |
86 |
| 6 With the glossy side of the stamp stencil film upward, align one of its ends with the slit on t... |
86 |
| 7 Hold the end of the stamp stencil film in place with your thumb, and then pass the tape through... |
87 |
| 8 Fold the other end of the stamp stencil film over the other side of the stamp film holder and h... |
87 |
| 9 Fit the stamp frame over the stamp stencil film and push it into place. |
87 |
| 0 Insert the stamp film holder straight into its cap. |
87 |
| LOCAL FORMAT FUNCTION |
88 |
| 1 Press f, w, e or h to position the cursor in the block that will be given a different format. |
88 |
| 2 Hold down c and press S once. “BLOCK FORM” appears in the top row of the display to indicate th... |
88 |
| 3 Select the desired font, size, width, style, underline or frame setting as described on pages�8... |
88 |
| 1 Press f, w, e or h to position the cursor in the shelf number block. |
88 |
| 2 Hold down c and press S once. |
88 |
| 3 Press m once. |
88 |
| 4 Continue pressing m until the I+SHAD style setting is displayed. |
89 |
| 5 Press _. |
89 |
| FONT FUNCTION |
89 |
| 1 Press k once to display the current font setting. |
89 |
| 2 Continue pressing k until the desired font setting is displayed. |
89 |
| 3 Press _ to apply the selected font setting to the text. |
89 |
| 1 Press k once. |
89 |
| 2 Continue pressing k until FONT 2 is displayed. |
90 |
| 3 Press _. |
90 |
| SIZE & WIDTH FUNCTIONS |
90 |
| 1 Press l once to display the current size setting. |
91 |
| 2 Continue pressing l until the desired size setting is displayed. |
91 |
| 3 Press _ to apply the selected size setting to the text. |
91 |
| 1 Press l once. |
92 |
| 2 Continue pressing l until 24 is displayed. |
92 |
| 3 Press _. |
92 |
| 1 Press n once to display the current width setting. |
92 |
| 2 Continue pressing n until the desired width setting is displayed. |
92 |
| 3 Press _ to apply the selected width setting to the text. |
92 |
| 1 Press n once. |
92 |
| 2 Continue pressing n until WIDE is displayed. |
92 |
| 3 Press _. |
92 |
| STYLE FUNCTION |
93 |
| 1 Press m once to display the current style setting. |
93 |
| 2 Continue pressing m until the desired style setting is displayed. |
93 |
| 3 Press _ to apply the selected style setting to the text. |
93 |
| 1 Press m once. |
93 |
| 2 Continue pressing m until I+SHAD is displayed. |
93 |
| 3 Press _. |
93 |
| UNDERLINE FUNCTION |
95 |
| 1 While holding down c, press 5 once, and keep c held down to display the current underline setting. |
95 |
| 2 While still holding down c, continue pressing 5 until the desired underline setting is displayed. |
95 |
| 3 Release c to apply the selected underline setting to the text. |
95 |
| 1 While holding down c, press 5 once, and keep c held down. |
95 |
| 2 While still holding down c, continue pressing 5 until ON1 is displayed. |
96 |
| 3 Release c. |
96 |
| FRAME FUNCTION |
96 |
| 1 While holding down c, press 6 once, and keep c held down to display the current frame setting. |
96 |
| 2 While still holding down c, continue pressing 6 until the desired frame setting is displayed. |
96 |
| 3 Release c to apply the selected frame setting to the text. |
96 |
| 1 While holding down c, press 6 once, and keep c held down. |
96 |
| 2 While still holding down c, continue pressing 6 until the candy frame is displayed. |
97 |
| 3 Release c. |
97 |
| TAPE MARGIN FUNCTION |
98 |
| 1 While holding down c, press E once, and keep c held down to display the current tape margin set... |
98 |
| 2 While still holding down c, continue pressing E until the desired tape margin setting is displa... |
98 |
| 3 Release c to apply the selected tape margin setting to the entire text. |
98 |
| 1 While holding down c, press E once, and keep c held down. |
98 |
| 2 While still holding down c, continue pressing E until HALF is displayed. |
99 |
| 3 Release c. |
99 |
| HORIZONTAL ALIGNMENT FUNCTION |
99 |
| 1 While holding down c, press R once, and keep c held down to display the current horizontal alig... |
99 |
| 2 While still holding down c, continue pressing R until the desired horizontal alignment setting ... |
99 |
| 3 Release c to apply the selected horizontal alignment setting to the entire text. |
99 |
| 1 While holding down c, press R once, and keep c held down. |
100 |
| 2 While still holding down c, continue pressing R until RIGHT is displayed. |
100 |
| 3 Release c. |
100 |
| MIRROR PRINTING FUNCTION |
100 |
| 1 While holding down c, press p once, and keep c held down to display the current mirror printing... |
100 |
| 2 While still holding down c, continue pressing p until the desired mirror printing setting is di... |
100 |
| 3 Release c to apply the selected mirror printing setting to the entire text. |
100 |
| 1 While holding down c, press p once, and keep c held down. |
101 |
| 2 While still holding down c, continue pressing p until ON is displayed. |
101 |
| 3 Release c. |
101 |
| LENGTH FUNCTION |
101 |
| 1 While holding down c, press T once, and keep c held down to display the current length of the l... |
101 |
| 2 While still holding down c, continue pressing T until the desired label length setting is displ... |
101 |
| 3 Release c. If ON was selected, the current label length setting is displayed. |
101 |
| 4 Press e or h to select the desired length or use the number keys to enter a length. |
101 |
| 5 Press _. |
102 |
| 1 While holding down c, press T once, and keep c held down. |
102 |
| 2 While still holding down c, continue pressing T until ON is displayed. |
102 |
| 3 Release c. |
102 |
| 4 Press e until 5.0 inch is displayed. |
102 |
| 5 Press _. |
102 |
| BARCODE FUNCTION |
102 |
| 1 Hold down c and press Y once. |
103 |
| 2 Type in the new barcode data or edit the old data. |
103 |
| 3 Press e. |
103 |
| 4 Press f or w until the parameter that you wish to change appears. |
103 |
| 5 Press e or h until the desired setting is displayed. |
103 |
| 6 Repeat steps 4 and 5 until all parameters are set as you wish. |
103 |
| 7 Press _. |
103 |
| 8 Press f or w until the cursor is below the character immediately to the right of where you wish... |
103 |
| 9 Hold down c and press a. |
103 |
| 0 Press e or h until the desired special character is displayed. |
103 |
| A Press _ to add the selected special character to the barcode data. |
104 |
| B Press _. |
105 |
| 1 Hold down c and press Y once. |
105 |
| 2 Press e. |
105 |
| 3 Press f or w until the CH.DIG. parameter is displayed. |
105 |
| 4 Press e or h until ON is displayed. |
105 |
| 5 Press _. |
105 |
| 6 Press 1, 2, 3, then 4. |
105 |
| 7 Press _. |
105 |
| TZ CUT FUNCTION |
106 |
| 1 While holding down c, press Z once, and keep c held down to display the current TZ cut setting. |
106 |
| 2 While still holding down c, continue pressing Z until the desired TZ cut setting is displayed. |
106 |
| 3 Release c to apply the selected TZ cut setting. |
106 |
| 1 While holding down c, press Z once, and keep c held down. |
106 |
| 2 While still holding down c, continue pressing Z until ON is displayed. |
106 |
| 3 Release c. |
106 |
| PRINT KEY |
107 |
| FEED & CUT FUNCTION |
107 |
| NUMBERING FUNCTION |
108 |
| 1 Hold down c and press O. The message “START?” appears in the display. |
108 |
| 2 Press f, w, e or h until the first character that you wish to select for the numbering field is... |
108 |
| 3 Press _. The message “END?” appears in the display. |
108 |
| 4 Press f, w, e or h until all of the characters that you wish to select for the number field are... |
108 |
| 5 Press _. The message “NUMBER” appears in the display. |
108 |
| 6 Press e or h until the desired number of copies is displayed, or use the number keys to type in... |
109 |
| 7 Press p (or _). |
109 |
| 8 Press e or h until the desired setting (EACH LABEL or AFTER LAST) is displayed. If EACH LABEL i... |
109 |
| 9 Press p or _ to begin printing the labels. The number of the copy being printed is displayed. |
109 |
| 1 Hold down c and press O. |
109 |
| 2 Press _. |
109 |
| 3 Make sure that just “1” is flashing, and then press _. |
109 |
| 4 Press 3. |
109 |
| 5 Press p (or _�). |
110 |
| If TZ tape is being printed on: |
110 |
| 6 Press p (or _�). |
110 |
| REPEAT PRINTING FUNCTION |
111 |
| 1 Hold down c and press I. The message “COPIES” appears in the display with the default setting 1... |
111 |
| 2 Press e or h until the desired number of copies is displayed, or use the number keys to type in... |
111 |
| 3 Press p (or _�) |
111 |
| 4 Press e or h until the desired setting (EACH LABEL or AFTER LAST) is displayed. If EACH LABEL i... |
111 |
| 5 Press p (or _) to begin printing the labels. The number of the copy being printed is displayed. |
111 |
| 1 Hold down c and press I. |
112 |
| 2 Press 3. |
112 |
| 3 Press p (or _�). |
112 |
| If TZ tape is being printed on: |
112 |
| 4 Press p (or _�). |
113 |
| MEMORY FUNCTIONS |
113 |
| 1 Hold down c and press 7. The message “STORE” appears on the display with the first available fi... |
113 |
| 2 Press e or h to select the file number where you wish to store the text. |
114 |
| 3 Press _. The text is stored under the selected file number and the text previously shown in the... |
114 |
| 1 Hold down c and press 7. |
114 |
| 2 Press e or h until file number 4 is displayed. |
114 |
| 3 Press _. |
114 |
| 1 Hold down c and press 8. The message “RECALL” appears on the display with the file number and b... |
115 |
| 2 Press e or h to select the file number containing the text that you wish to recall. The text st... |
115 |
| 3 Press _. Any text previously entered in the display is erased and the text stored under the sel... |
115 |
| 1 Hold down c and press 8. |
115 |
| 2 Press e or h until file number 1 is displayed. |
115 |
| 3 Press _. |
115 |
| 1 Hold down c and press 9. The message “CLEAR” appears on the display with the file number and be... |
116 |
| 2 Press e or h to select the file number containing the text that you wish to delete. The text st... |
116 |
| 3 Press _. The message “OK TO CLEAR?” appears. |
116 |
| 4 Press _ to delete the text file that was selected. |
116 |
| 1 Hold down c and press 9. |
116 |
| 2 Press e or h until file number 4 is displayed. |
116 |
| 3 Press _. |
116 |
| 4 Press _. |
116 |
| 1 Hold down c and press 0. “PRINT” appears on the display with the file number and beginning of t... |
117 |
| 2 Press e or h to display the file containing the text that you wish to print. The text stored un... |
117 |
| 3 Press r so that the file number flashes. |
117 |
| 4 Repeat steps 2 and 3 until the file numbers for all files that you wish to print are flashing. |
117 |
| 5 Press _. The text stored under the selected file numbers is printed. |
117 |
| 1 Press i or j, depending on the type of layout that you wish to print. |
117 |
| 2 Hold down c and press 0. The name of the layout appears in the top line of the display and the ... |
117 |
| 3 Press e or h to display the file containing the text that you wish to print. The text stored un... |
117 |
| 4 Press r so that the file number flashes. |
117 |
| 5 Repeat steps 3 and 4 until the file numbers for all files that you wish to print are flashing. |
117 |
| 6 Press _. “MENU” appears in the display. |
117 |
| 7 Make sure that PRINT is flashing, and then press _. All of the selected files are printed. |
117 |
| 8 Press e or h until the CHNGE STL? command is displayed. |
117 |
| 9 Press _. |
118 |
| 0 Press e or h to select the desired character style. |
118 |
| A Press _. “MENU” appears in the display. |
118 |
| B Press e or h until the PRINT MORE command is displayed. |
118 |
| C Press _. The name of the layout appears in the top line of the display and the file number and ... |
118 |
| D Press e or h to display the file containing the text that you wish to print. |
118 |
| E Press r so that the file number flashes. |
118 |
| F Repeat steps D and E until the file numbers for all files that you wish to print are flashing. |
118 |
| G Press _. “MENU” appears in the display. |
118 |
| H Make sure that PRINT is flashing, and then press _. All of the selected files are printed. |
118 |
| I Press e or h until the EXIT command is displayed. |
118 |
| J Press _ |
118 |
| 1 Hold down c and press 0. |
118 |
| 2 Since this is one of the files that we wish to print, press r. |
118 |
| 3 Press e or h until file number 2 is displayed. |
118 |
| 4 Press r. |
119 |
| 5 Press _. |
119 |
| 1 Press i. |
119 |
| 2 Hold down c and press 0. |
119 |
| 3 Since this is one of the files that we wish to print, press r. |
119 |
| 4 Press e or h until file number 3 is displayed. |
119 |
| 5 Press r. |
120 |
| 6 Press _. |
120 |
| 7 Press _. |
120 |
| TROUBLESHOOTING |
121 |
| ERROR MESSAGE LIST |
122 |
| SPECIFICATIONS |
127 |
| ACCESSORIES (For USA Only) |
129 |
| INDEX |
132 |
| A |
132 |
| B |
132 |
| C |
132 |
| D |
132 |
| E |
132 |
| F |
132 |
| I |
132 |
| K |
132 |
| L |
132 |
| M |
132 |
| N |
132 |
| O |
132 |
| P |
133 |
| R |
133 |
| S |
133 |
| T |
133 |
| U |
133 |
| W |
133 |
| PT-2600/2610 CONTACT INFORMATION (For USA Only) |
135 |
| Service Center Locations |
135 |
| Operational Assistance |
135 |
| Assistance on the Internet |
135 |
| Accessories and Supplies |
135 |
| Fax-Back System |
135 |
| P-TOUCH ACCESSORY ORDER FORM (For USA Only) |
136 |
| PT-2600/2610 CONTACT INFORMATION (For USA Only) |
137 |
| Service Center Locations |
137 |
| Operational Assistance |
137 |
| Assistance on the Internet |
137 |
| Accessories and Supplies |
137 |
| Fax-Back System |
137 |
| P-TOUCH ACCESSORY ORDER FORM (For USA Only) |
138 |
| PT-2600.bookES.pdf |
140 |
| ÍNDICE |
141 |
| Cabeza de impresión |
193 |
| Cabeza de impresión |
193 |
| Cabeza de impresión |
193 |
| Rodillos |
193 |
| Palillo de cabeza de algodón |
193 |
| CABEZA DE IMPRESIÓN Y RODILLOS |
193 |
| De vez en cuando, el polvo se adhieren a la cabezal de impresión y a los rodillos del el equipo. ... |
193 |
| 1 Mantenga presionado c y presione s. El indicador de Caps, de la izquierda del visualizador, se ... |
195 |
| FUNCIÓN DE NUEVO BLOQUE |
197 |
| TABULACIÓN |
197 |
| 1 Mantenga pulsada c y presione W una vez. Se visualizará la longitud de tabulación actual. |
197 |
| 2 Presione e o h hasta que se visualice la longitud deseada, o utilice las teclas numéricas para ... |
198 |
| TECLA DE BORRADO (DEL) |
198 |
| 3 Presione f o w hasta que aparezca el carácter acentuado deseado ampliado dentro del recuadro en... |
200 |
| 4 Presione _. El carácter acentuado será añadido al texto. |
200 |
| FUNCIÓN DE SÍMBOLOS |
201 |
| 3 Presione _. El símbolo será añadido al texto. |
201 |
| FUNCIÓN DE FORMATO AUTOMÁTICO |
202 |
| 1 Presione io juna vez. El indicador A/F se encenderá. |
202 |
| 2 Presione e o h hasta que aparezca el nombre del diseño deseado. |
202 |
| 3 Presione _. Aparecerá el primer campo para el diseño seleccionado en el visualizador. |
202 |
| 4 Introduzca texto en cada campo, y después presione _. Cuando se presione _ después de introduci... |
202 |
| 6 Presione _. |
203 |
| 7 Presione e o h para seleccionar el estilo de caracteres deseado. |
203 |
| 8 Presione _. Aparecerá “MENU” en el visualizador. |
203 |
| 9 Presione e o h hasta que se visualice el comando PRINT. |
203 |
| A Presione e o h hasta que se visualice el comando EDIT MORE. |
203 |
| B Presione _. Aparecerá el primer campo del diseño seleccionado en el visualizador. |
203 |
| C Repita el paso 4 hasta que el texto esté editado como usted desea. El MENU aparecerá otra vez c... |
203 |
| D Presione e o h hasta que se visualice el comando EXIT. |
203 |
| E Presione _. Aparecerá el mensaje “EXIT AUTO FORMAT?” en el visualizador. |
203 |
| F Presione _. Saldrá de la función de Formato automático, y volverá a aparecer en la pantalla el ... |
203 |
| 1 Escriba el texto, y después inserte un casete de película de membretes de tamaño medio (3/4” (1... |
211 |
| 2 Mantenga presionado c y presione U una vez. Aparecerá el mensaje “STAMP FORMAT?” en el visualiz... |
211 |
| 3 Presione _. El texto se formateará automáticamente para el membrete instalado: centrado dentro ... |
211 |
| 4 Presione p para separar el texto del cliché de membrete. |
211 |
| 5 Después de haber cortado la película matriz de sellos, extraiga el papel del dorso del cliché d... |
211 |
| 1 Extraiga el marco del membrete de entorno al lado al tampón de tinta del soporte de películas d... |
212 |
| 2 Con el lado brillante del cliché del membrete encarado hacia arriba, alinee uno de sus extremos... |
212 |
| 3 Retenga el extremo del cliché del membrete en su lugar con el dedo pulgar, y pase la cinta por ... |
212 |
| 4 Pliegue el otro extremo del cliché del membrete por en otro lado del soporte de películas de me... |
212 |
| 5 Adapte el marco del membrete encima del cliché del membrete y presiónelo a su lugar. |
212 |
| 6 Inserte el soporte de películas de membrete recto en su tapa. |
212 |
| FUNCIÓN DE FORMATO LOCAL |
212 |
| 1 Presione f, w, e o h para colocar el cursor en el bloque al que desee aplicar un formato difere... |
212 |
| 2 Mantenga presionado c y presione S una vez. En la fila superior del visualizador aparecerá “BLO... |
212 |
| 3 Seleccione el ajuste de tipo de caracteres, tamaño, anchura, estilo, subrayado, o enmarcado com... |
212 |
| FUNCIÓN DEL TIPO DE CARACTERES |
213 |
| 1 Presione k una vez para visualizar el ajuste de tipo de caracteres actual. |
213 |
| FUNCIONES DE TAMAÑO Y DE ANCHURA |
213 |
| 1 Presione l una vez para visualizar el ajuste de tamaño actual. |
214 |
| 2 Continúe presionando l hasta que se visualice el ajuste de tamaño deseado. |
214 |
| 3 Presione _ para aplicar el ajuste de tamaño seleccionado al texto. |
214 |
| 1 Presione n una vez para visualizar el ajuste de anchura actual. |
215 |
| 2 Continúe presionando n hasta que se visualice el ajuste de anchura deseado. |
215 |
| 3 Presione _ para aplicar el ajuste de anchura seleccionado al texto. |
215 |
| FUNCIÓN DE ESTILO |
215 |
| 1 Presione m una vez para visualizar el ajuste de estilo actual. |
215 |
| 2 Continúe presionando m hasta que se visualice el ajuste de estilo deseado. |
215 |
| 3 Presione _ para aplicar el ajuste de estilo seleccionado al texto. |
215 |
| FUNCIÓN DE SUBRAYADO |
215 |
| 1 Manteniendo presionada c, pulse una vez 5, y mantenga presionada c para hacer que se visualice ... |
216 |
| 2 Siguiendo manteniendo presionada c, continúe presionando 5 hasta que se visualice el subrayado ... |
216 |
| 3 Para aplicar el ajuste de subrayado seleccionado a todo el texto, suelte c. |
216 |
| FUNCIÓN DE MARCOS |
216 |
| 1 Manteniendo presionada c, pulse una vez 6, y mantenga presionada c para hacer que se visualice ... |
216 |
| 2 Siguiendo manteniendo presionada c, continúe presionando 6 hasta que se visualice el marco actu... |
216 |
| 3 Para aplicar el ajuste de marco seleccionado a todo el texto, suelte c. |
216 |
| FUNCIÓN DE CINTA |
218 |
| 1 Manteniendo presionada c, pulse una vez E, y mantenga presionada c para hacer que se visualice ... |
218 |
| 2 Siguiendo manteniendo presionada c, continúe presionando E hasta que se visualice la cinta actu... |
218 |
| 3 Para aplicar el ajuste de la impresión en modo espejo seleccionado a todo el texto, suelte c. |
219 |
| FUNCIÓN DE LONGITUD |
219 |
| 1 Manteniendo presionada c, presione una vez T, y mantenga presionada c hasta que se visualice br... |
220 |
| FUNCIÓN DE CÓDIGO DE BARRAS |
220 |
| 1 Mantenga presionado c y presione Yuna vez. |
221 |
| 2 Escriba los datos del nuevo código de barras o edite el antiguo. |
221 |
| 3 Presione e. |
221 |
| 5 Presione e o h hasta que se visualice el ajuste deseado. |
221 |
| 6 Repita los pasos 4 y 5 hasta haber ajustado todos los parámetros que desee. |
221 |
| 7 Presione _. |
221 |
| 8 Presione f o w hasta que el cursor se coloque debajo del carácter situado a la derecha de donde... |
221 |
| 9 Mantenga presionado c y presione a. |
221 |
| 0 Presione e o h hasta que se visualice el carácter especial. |
221 |
| A Presione _ para añadir el carácter especial seleccionado al código de barras. |
223 |
| B Presione _. |
223 |
| 1 Mientras mantiene presionada c, presione una vez Z y mantenga presionada c para visualizar al a... |
223 |
| 2 Mientras mantiene presionada c, continúe presionando Z hasta que se visualice el ajuste de cort... |
223 |
| 3 Suelte c para aplicar el ajuste de corte TZ seleccionado. |
223 |
| TECLA DE IMPRESIÓN |
223 |
| 1 Mantenga presionada c y presione O. Aparecerá el mensaje “START?” en el visualizador. |
225 |
| 2 Presione f, w, e o h hasta que esté parpadeando el primer carácter que desee seleccionar para e... |
225 |
| 3 Presione _. Aparecerá el mensaje “END?” en el visualizador. |
225 |
| 4 Presione f, w, e o h hasta que estén parpadeando todos los caracteres que desee seleccionar par... |
225 |
| 5 Presione _. Aparecerá el mensaje “NUMBER” en el visualizador. |
225 |
| 6 Presione e o h hasta que se visualice el número de copias deseado, o utilice las teclas numéric... |
225 |
| 7 Presione p (o _). |
225 |
| 8 Presione e o h hasta que se visualice el ajuste deseado (EACH LABEL o AFTER LAST). Si seleccion... |
225 |
| 9 Presione p o _ para empezar a imprimir las etiquetas. Se visualizará el número de la copia que ... |
225 |
| FUNCIÓN DE IMPRESIÓN REPETIDA |
226 |
| 1 Mantenga presionada c y presione I. En el visualizador aparecerá el mensaje “COPIES” con el aju... |
226 |
| 2 Presione e o h hasta que se muestre el número deseado de copias, o utilice las teclas numéricas... |
226 |
| 3 Presione p (o _). |
226 |
| 4 Presione e o h hasta que se visualice el ajuste deseado (EACH LABEL o AFTER LAST). Si seleccion... |
226 |
| 5 Presione p o _ para empezar a imprimir las etiquetas. Se visualizará el número de la copia que ... |
226 |
| 2 Presione e o h para seleccionar el número de archivo donde quiera almacenar el texto. |
227 |
| 3 Presione _. El texto se almacenará en el número de archivo seleccionado y volverá a aparecer en... |
227 |
| 2 Presione e o h para seleccionar el número de archivo que contenga el texto que quiera borrar. S... |
228 |
| 1 Mantenga presionada c y presione 0. Aparecerá el mensaje “PRINT” en el visualizador con en núme... |
229 |
| 2 Presione e o h para visualizar el archivo que contenga el texto que desee imprimir. El texto al... |
229 |
| 3 Presione r para que parpadee el número de archivo. |
229 |
| 4 Repita los pasos 2 y 3 hasta que estén parpadeando los números de todos los archivos que quiera... |
229 |
| 5 Presione _. Se imprimirá el texto almacenado en los números de archivos seleccionados. |
229 |
| 1 Presione i o j, dependiendo del tipo de diseño que desee imprimir. |
229 |
| 2 Mantenga presionada c y presione 0. El nombre del diseño aparecerá en la línea superior del vis... |
229 |
| 3 Presione e o h para visualizar el archivo que contenga el texto que desee imprimir. El texto al... |
229 |
| 4 Presione r para que parpadee el número de archivo. |
229 |
| 5 Repita los pasos 3 y 4 hasta que estén parpadeando los números de todos los archivos que quiera... |
229 |
| 6 Presione _. Aparecerá “MENU” en el visualizador. |
229 |
| 7 Asegúrese de que PRINT esté parpadeando, y después presione _. Se imprimirán todos los archivos... |
229 |
| 8 Presione e o h hasta que se visualice el comando CHNGE STL?. |
230 |
| 9 Presione _. |
230 |
| 0 Presione e o h para seleccionar el estilo de caracteres deseado. |
230 |
| A Presione _. Aparecerá “MENU” en el visualizador. |
230 |
| B Presione e o h hasta que se visualice el comando PRINT MORE. |
230 |
| C Presione _. El nombre del diseño aparecerá en la línea superior del visualizador y el número de... |
230 |
| D Presione e o h para visualizar el archivo que contenga el texto que desee imprimir. |
230 |
| E Presione r para que parpadee el número de archivo. |
230 |
| F Repita los pasos D y E hasta que estén parpadeando los números de todos los archivos que quiera... |
230 |
| G Presione _. Aparecerá “MENU” en el visualizador. |
230 |
| H Asegúrese de que PRINT esté parpadeando, y después presione _. Se imprimirán todos los archivos... |
230 |
| I Presione e o h hasta que se visualice el comando EXIT. |
230 |
| J Presione _ |
230 |
| SOLUCIÓN DE PROBLEMAS |
231 |
| LISTA DE MENSAJES DE ERROR |
232 |
| ESPECIFICACIONES |
238 |
| ACCESORIOS (Sólo para EE.UU.) |
243 |
| A |
243 |
| B |
243 |
| C |
243 |
| E |
243 |
| F |
243 |
| I |
243 |
| L |
243 |
| M |
243 |
| P |
243 |
| R |
243 |
| S |
244 |
| T |
244 |
| V |
244 |
| INFORMACIÓN PARA CONTACTAR CON PT-2600/2610 (Sólo para EE.UU.) |
246 |
| Ahorre tiempo – Regístrese en Linea! |
246 |
| No pierda tiempo al teléfono. Despreocúpese por el correo. Visítenos en |
246 |
| www.registermybrother.com |
246 |
| Regístre su producto inmediatamente en nuestra base y listo. |
246 |
| También en su visita, encuentre información útil y participe en sorteos! |
246 |
| HOJA DE PEDIDOS DE ACCESORIOS PARA P-TOUCH (Sólo para EE.UU.) |
247 |
| INFORMACIÓN PARA CONTACTAR CON PT-2600/2610 (Sólo para EE.UU.) |
248 |
| Localización de centros de servicio |
248 |
| Asistencia operacional |
248 |
| Accesorios y suministros |
248 |
| Sistema de contestación por fax |
248 |
| Ahorre tiempo – Regístrese en Linea! |
248 |
| No pierda tiempo al teléfono. Despreocúpese por el correo. Visítenos en |
248 |
| www.registermybrother.com |
248 |
| Regístre su producto inmediatamente en nuestra base y listo. |
248 |
| También en su visita, encuentre información útil y participe en sorteos! |
248 |
 1
1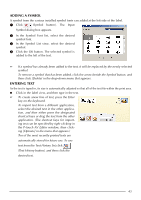 50
50 51
51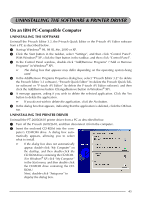 52
52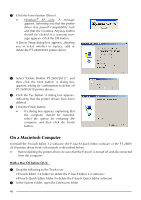 53
53 54
54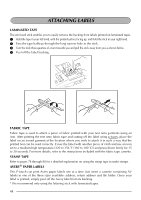 55
55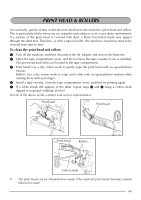 56
56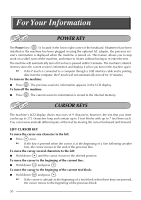 57
57 58
58 59
59 60
60

