Brother International PT2710 Software Users Manual - English and Spanish - Page 4
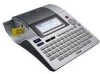
Next], Back], Finish] - desktop labeling system
 |
UPC - 012502615569
View all Brother International PT2710 manuals
Add to My Manuals
Save this manual to your list of manuals |
Page 4 highlights
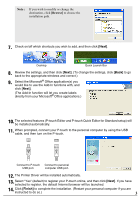
Note : If you wish to modify or change the destination, click [Browse] to choose the installation path. 7. Check on/off which shortcuts you wish to add, and then click [Next]. Desktop Quick Launch Bar 8. Review the settings, and then click [Next]. (To change the settings, click [Back] to go back to the appropriate windows and correct.) 9. Select the Microsoft® Office application(s) you would like to use the Add-In functions with, and click [Next]. (The Add-In function will let you create labels directly from your Microsoft® Office applications.) 10. The selected features (P-touch Editor and P-touch Quick Editor for Standard setup) will be installed automatically. 11. When prompted, connect your P-touch to the personal computer by using the USB cable, and then turn on the P-touch. Connect to P-touch Connect to personal USB port. computer USB port. 12. The Printer Driver will be installed automatically. 13. Select "Yes" (default) to register your P-touch online, and then click [Next]. If you have selected to register, the default Internet browser will be launched. 14. Click [Finish] to complete the installation. (Restart your personal computer if you are instructed to do so.) 3
-
 1
1 -
 2
2 -
 3
3 -
 4
4 -
 5
5 -
 6
6 -
 7
7 -
 8
8 -
 9
9 -
 10
10 -
11
-
12
-
13
-
14
-
15
-
16
-
17
-
18
-
19
-
20
-
21
-
22
-
23
-
24
-
25
-
26
-
27
-
28
-
29
-
30
-
31
-
32
-
33
-
34
-
35
-
36
-
37
-
38
-
39
-
40
-
41
-
42
-
43
-
44
-
45
-
46
-
47
-
48
-
49
-
50
-
51
-
52
-
53
-
54
-
55
-
56
-
57
-
58
-
59
-
60
-
61
-
62
-
63
-
64
-
65
-
66
-
67
-
68
-
69
-
70
-
71
-
72
-
73
-
74
-
75
-
76
-
77
-
78
-
79
-
80
-
81
-
82
-
83
-
84
-
85
-
86
-
87
-
88
-
89
-
90
 |
 |
