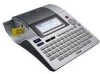
Brother International PT2710 Software Users Manual - English and Spanish - Page 7
INSTALLING THE SOFTWARE, Next], Install], Done], Quick Editor Installer] - pt printer
 |
UPC - 012502615569
View all Brother International PT2710 manuals
Add to My Manuals
Save this manual to your list of manuals |
Page 7 highlights
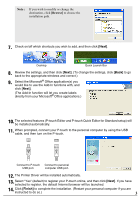
INSTALLING THE SOFTWARE Note : • Do not connect the USB cable to your personal computer until the installation of Ptouch Editor, P-touch Quick Editor and Printer Driver is complete. • Make sure you are logged on as a user with administrator rights. • For PT-2710 user (USA), please follow the same procedure as PT-2700. P-touch Editor 1. Start up Macintosh® and insert the CD-ROM into the CD-ROM drive. The PT-2700 screen is displayed. Note : If the PT-2700 screen does not appear, double click the PT-2700 (CD-ROM) icon. If you wish to cancel the installation in the middle of the process, click [Exit]. 2. Double click [P-touch Editor 3.2 Installer] inside the [P-touch Editor 3.2] folder. 3. Check the contents and click [Next] until the [Choose Product Components] screen appears. 4. Check the programs you wish to install and click [Next]. 5. Select the location to create the icon for the alias, and click [Next]. Note : "In the Dock" is only available for OS 10.1. If you select this option while running other versions of OS X, no icon will be added and the icons displayed in the dock may reset to those available when the OS was first installed. 6. Click [Install]. The installation will begin. When the installation is complete, the message "The software was successfully installed" is displayed. 7. After the installation is complete, click [Done]. P-touch Quick Editor 1. Double click [Quick Editor Installer] inside the [P-touch Quick Editor] folder. 2. Click [OK] until the Choose Alias Folder screen appears. 3. Select the location to create the icon for the alias, and click [Next]. 6
-
 1
1 -
 2
2 -
 3
3 -
 4
4 -
 5
5 -
 6
6 -
 7
7 -
 8
8 -
 9
9 -
 10
10 -
 11
11 -
 12
12 -
13
-
14
-
15
-
16
-
17
-
18
-
19
-
20
-
21
-
22
-
23
-
24
-
25
-
26
-
27
-
28
-
29
-
30
-
31
-
32
-
33
-
34
-
35
-
36
-
37
-
38
-
39
-
40
-
41
-
42
-
43
-
44
-
45
-
46
-
47
-
48
-
49
-
50
-
51
-
52
-
53
-
54
-
55
-
56
-
57
-
58
-
59
-
60
-
61
-
62
-
63
-
64
-
65
-
66
-
67
-
68
-
69
-
70
-
71
-
72
-
73
-
74
-
75
-
76
-
77
-
78
-
79
-
80
-
81
-
82
-
83
-
84
-
85
-
86
-
87
-
88
-
89
-
90
 |
 |
