Brother International SE-270D Users Manual - English - Page 154
Troubleshooting
 |
View all Brother International SE-270D manuals
Add to My Manuals
Save this manual to your list of manuals |
Page 154 highlights
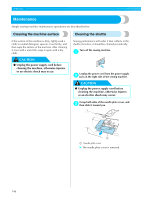
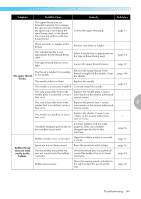
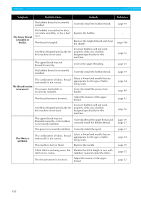
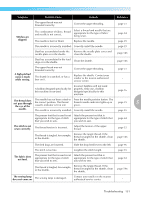
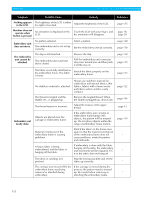
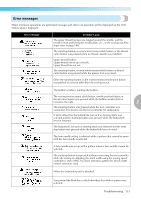
APPENDIX Troubleshooting If the machine stops operating correctly, check the following possible problems before requesting service. If the problem persists, contact your retailer or the nearest authorized service center. Symptom Probable Cause Remedy The machine is not turned on. Turn on the machine. The sewing machine does not operate. The start/stop button was not pressed. The presser foot lever is raised. The start/stop button was pressed, even though the foot controller is connected. Press the start/stop button. Lower the presser foot lever. Do not use the start/stop button when the foot controller is connected. To use the start/stop button, disconnect the foot controller. The needle is incorrectly installed. Correctly install the needle. The needle clamp screw is loose. Use the screwdriver to firmly tighten the screw. The needle is bent or blunt. Replace the needle. The combination of fabric, thread and needle is not correct. Select a thread and needle that are appropriate for the type of fabric being sewn. The presser foot that is used is not Attach the presser foot that is appropriate for the type of stitch appropriate for the type of stitch that that you wish to sew. you wish to sew. The upper thread tension is too tight. Loosen the upper thread tension. The needle breaks. The fabric is pulled too much. The spool is incorrectly installed. Lightly guide the fabric. Correctly install the spool. The area around the hole in the Replace the needle plate. Contact needle plate is scratched, or has a your retailer or the nearest authorized burr on it. service center. The area around the hole in the presser foot is scratched, or has a burr on it. Replace the presser foot. Contact your retailer or the nearest authorized service center. The shuttle is scratched, or has a burr on it. Replace the shuttle. Contact your retailer or the nearest authorized service center. A bobbin designed specifically for this machine is not used. Incorrect bobbins will not work properly. Only use a bobbin designed specifically for this machine. Reference page 11 page 47 page 46 page 47 page 35 page 34 page 64 page 52 - page 21 - - - page 16 148
-
 1
1 -
2
-
3
-
4
-
5
-
6
-
7
-
8
-
9
-
10
-
11
-
12
-
13
-
14
-
15
-
16
-
17
-
18
-
19
-
20
-
21
-
22
-
23
-
24
-
25
-
26
-
27
-
28
-
29
-
30
-
31
-
32
-
33
-
34
-
35
-
36
-
37
-
38
-
39
-
40
-
41
-
42
-
43
-
44
-
45
-
46
-
47
-
48
-
49
-
50
-
51
-
52
-
53
-
54
-
55
-
56
-
57
-
58
-
59
-
60
-
61
-
62
-
63
-
64
-
65
-
66
-
67
-
68
-
69
-
70
-
71
-
72
-
73
-
74
-
75
-
76
-
77
-
78
-
79
-
80
-
81
-
82
-
83
-
84
-
85
-
86
-
87
-
88
-
89
-
90
-
91
-
92
-
93
-
94
-
95
-
96
-
97
-
98
-
99
-
100
-
101
-
102
-
103
-
104
-
105
-
106
-
107
-
108
-
109
-
110
-
111
-
112
-
113
-
114
-
115
-
116
-
117
-
118
-
119
-
120
-
121
-
122
-
123
-
124
-
125
-
126
-
127
-
128
-
129
-
130
-
131
-
132
-
133
-
134
-
135
-
136
-
137
-
138
-
139
-
140
-
141
-
142
-
143
-
144
-
145
-
146
-
147
-
148
-
 149
149 -
 150
150 -
 151
151 -
 152
152 -
 153
153 -
 154
154 -
 155
155 -
 156
156 -
 157
157 -
 158
158 -
 159
159 -
160
-
161
-
162
-
163
-
164
-
165
-
166
 |
 |
