Brother International SE-270D Users Manual - English - Page 44
Replacing the Presser Foot
 |
View all Brother International SE-270D manuals
Add to My Manuals
Save this manual to your list of manuals |
Page 44 highlights
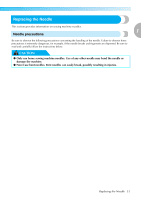
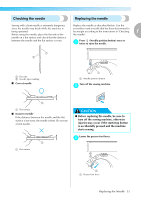
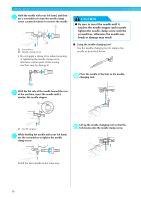
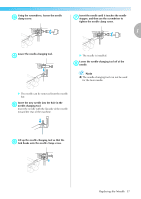
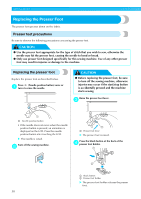
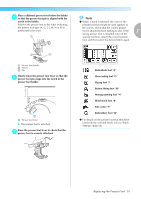
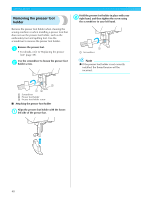
GETTING READY Replacing the Presser Foot The presser foot presses down on the fabric. Presser foot precautions Be sure to observe the following precautions concerning the presser feet. CAUTION ● Use the presser foot appropriate for the type of stitch that you wish to sew, otherwise the needle may hit the presser foot, causing the needle to bend or break. ● Only use presser feet designed specifically for this sewing machine. Use of any other presser foot may result in injuries or damage to the machine. Replacing the presser foot Replace the presser foot as described below. Press (Needle position button) once or a twice to raise the needle. CAUTION ● Before replacing the presser foot, be sure to turn off the sewing machine, otherwise injuries may occur if the start/stop button is accidentally pressed and the machine starts sewing. Raise the presser foot lever. c 1 a Needle position button • If the needle does not move when the needle position button is pressed, an animation is displayed on the LCD. Press the needle position button after touching the LCD. X The needle is raised. Turn off the sewing machine. b 1 a Presser foot lever X The presser foot is raised. Press the black button at the back of the d presser foot holder. 1 2 a Black button b Presser foot holder X The presser foot holder releases the presser foot. 38
-
 1
1 -
2
-
3
-
4
-
5
-
6
-
7
-
8
-
9
-
10
-
11
-
12
-
13
-
14
-
15
-
16
-
17
-
18
-
19
-
20
-
21
-
22
-
23
-
24
-
25
-
26
-
27
-
28
-
29
-
30
-
31
-
32
-
33
-
34
-
35
-
36
-
37
-
38
-
 39
39 -
 40
40 -
 41
41 -
 42
42 -
 43
43 -
 44
44 -
 45
45 -
 46
46 -
 47
47 -
 48
48 -
 49
49 -
50
-
51
-
52
-
53
-
54
-
55
-
56
-
57
-
58
-
59
-
60
-
61
-
62
-
63
-
64
-
65
-
66
-
67
-
68
-
69
-
70
-
71
-
72
-
73
-
74
-
75
-
76
-
77
-
78
-
79
-
80
-
81
-
82
-
83
-
84
-
85
-
86
-
87
-
88
-
89
-
90
-
91
-
92
-
93
-
94
-
95
-
96
-
97
-
98
-
99
-
100
-
101
-
102
-
103
-
104
-
105
-
106
-
107
-
108
-
109
-
110
-
111
-
112
-
113
-
114
-
115
-
116
-
117
-
118
-
119
-
120
-
121
-
122
-
123
-
124
-
125
-
126
-
127
-
128
-
129
-
130
-
131
-
132
-
133
-
134
-
135
-
136
-
137
-
138
-
139
-
140
-
141
-
142
-
143
-
144
-
145
-
146
-
147
-
148
-
149
-
150
-
151
-
152
-
153
-
154
-
155
-
156
-
157
-
158
-
159
-
160
-
161
-
162
-
163
-
164
-
165
-
166
 |
 |