Brother International SE-270D Users Manual - English - Page 25
Installing the bobbin - sewing machine parts
 |
View all Brother International SE-270D manuals
Add to My Manuals
Save this manual to your list of manuals |
Page 25 highlights
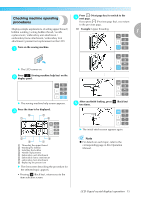
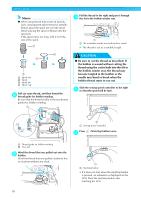
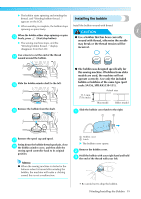
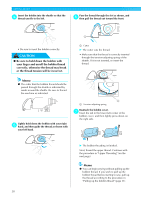
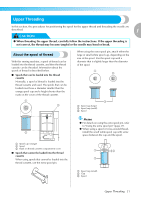
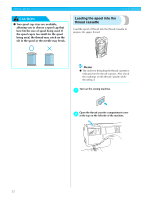
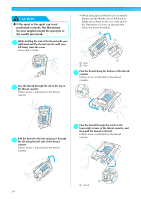
X The bobbin starts spinning and winding the thread, and "Winding bobbin thread..." appears on the LCD. Installing the bobbin X When winding is complete, the bobbin stops Install the bobbin wound with thread. spinning or spins freely. CAUTION 1 When the bobbin either stops spinning or spins m freely, press (Start/stop button). X The sewing machine stops, and the "Winding bobbin thread..." display disappears from the LCD. ● Use a bobbin that has been correctly wound with thread, otherwise the needle may break or the thread tension will be incorrect. Use scissors to cut the end of the thread n wound around the bobbin. Slide the bobbin winder shaft to the left. o Remove the bobbin from the shaft. p ● The bobbin was designed specifically for this sewing machine. If bobbins from older models are used, the machine will not operate correctly. Use only the included bobbin or bobbins of the same type (part code: SA156, SFB:XA5539-151). Actual size 11.5 mm (7/16 inch) This model Older model Slide the bobbin cover latch to the right. a 1 2 Remove the spool cap and spool. q Swing down the bobbin thread spool pin, close r the bobbin winder cover, and then slide the sewing speed controller back to its original position. Memo z When the sewing machine is started or the balance wheel is turned after winding the bobbin, the machine will make a clicking sound; this is not a malfunction. a Bobbin cover b Latch X The bobbin cover opens. Remove the bobbin cover. b Hold the bobbin with your right hand and hold c the end of the thread with your left. • Be careful not to drop the bobbin. Winding/Installing the Bobbin 19
-
 1
1 -
2
-
3
-
4
-
5
-
6
-
7
-
8
-
9
-
10
-
11
-
12
-
13
-
14
-
15
-
16
-
17
-
18
-
19
-
 20
20 -
 21
21 -
 22
22 -
 23
23 -
 24
24 -
 25
25 -
 26
26 -
 27
27 -
 28
28 -
 29
29 -
 30
30 -
31
-
32
-
33
-
34
-
35
-
36
-
37
-
38
-
39
-
40
-
41
-
42
-
43
-
44
-
45
-
46
-
47
-
48
-
49
-
50
-
51
-
52
-
53
-
54
-
55
-
56
-
57
-
58
-
59
-
60
-
61
-
62
-
63
-
64
-
65
-
66
-
67
-
68
-
69
-
70
-
71
-
72
-
73
-
74
-
75
-
76
-
77
-
78
-
79
-
80
-
81
-
82
-
83
-
84
-
85
-
86
-
87
-
88
-
89
-
90
-
91
-
92
-
93
-
94
-
95
-
96
-
97
-
98
-
99
-
100
-
101
-
102
-
103
-
104
-
105
-
106
-
107
-
108
-
109
-
110
-
111
-
112
-
113
-
114
-
115
-
116
-
117
-
118
-
119
-
120
-
121
-
122
-
123
-
124
-
125
-
126
-
127
-
128
-
129
-
130
-
131
-
132
-
133
-
134
-
135
-
136
-
137
-
138
-
139
-
140
-
141
-
142
-
143
-
144
-
145
-
146
-
147
-
148
-
149
-
150
-
151
-
152
-
153
-
154
-
155
-
156
-
157
-
158
-
159
-
160
-
161
-
162
-
163
-
164
-
165
-
166
 |
 |
