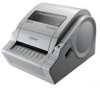
Brother International TD-4100N Users Manual - English and Spanish - Page 23
Installing the Software for TD- 4100N, Standard Installation, Custom Installation
 |
View all Brother International TD-4100N manuals
Add to My Manuals
Save this manual to your list of manuals |
Page 23 highlights
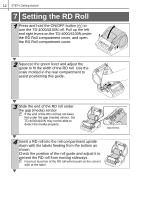
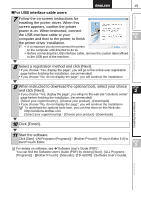
Introduction 17 Installing the Software 2 Installing the Software for TD4100N The procedure for installing the software varies depending on the OS of the computer. Install procedure is subject to change without notice. Please note: It is important you do not connect the printer to the computer until directed to do so. This section explains how to install P-touch Editor 5.0, the Printer Driver and the User's Guide using the Standard Installation option. The following is the example for Windows Vista®. 1 Start the computer and put the CD-ROM into the CD-ROM drive. If it does not start up automatically, open the files on the CD-ROM and double click on "Setup.exe". STEP 1 Getting started 2 Click "Standard Installation". Installation items: 1 Standard Installation P-touch Editor 5.0, Printer Driver, Software User's Guide (PDF), and Network User's Guide (PDF) 1 2 3 4 2 Custom Installation Individually install P-touch Editor 5.0, Printer Driver or User's Guide (PDF). When the user's guide is selected, Software User's Guide (PDF) and Network User's Guide (PDF) is installed. 3 Utility Installation BRAdmin Light 4 User's Guide Software User's Guide (PDF), Network User's Guide (PDF), and link to the download page for Adobe® Reader®. Installing the software STEP 2 STEP 3 3 Read the license agreement and click [Yes] if you agree with the terms and conditions. Reference 4 Follow the on-screen instructions to complete the Standard Installation.
-
 1
1 -
2
-
3
-
4
-
5
-
6
-
7
-
8
-
9
-
10
-
11
-
12
-
13
-
14
-
15
-
16
-
17
-
 18
18 -
 19
19 -
 20
20 -
 21
21 -
 22
22 -
 23
23 -
 24
24 -
 25
25 -
 26
26 -
 27
27 -
 28
28 -
29
-
30
-
31
-
32
-
33
-
34
-
35
-
36
-
37
-
38
-
39
-
40
-
41
-
42
-
43
-
44
-
45
-
46
-
47
-
48
-
49
-
50
-
51
-
52
-
53
-
54
-
55
-
56
-
57
-
58
-
59
-
60
-
61
-
62
-
63
-
64
-
65
-
66
-
67
-
68
-
69
-
70
-
71
-
72
-
73
-
74
-
75
-
76
-
77
-
78
-
79
-
80
 |
 |
