Brother International VX-940 Users Manual - English - Page 34
Button, Sewing
 |
View all Brother International VX-940 manuals
Add to My Manuals
Save this manual to your list of manuals |
Page 34 highlights
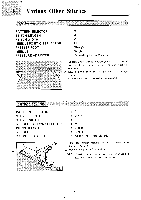
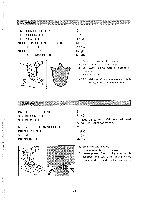
Button Sewing PATTERN SELECTOR STITCH LENGTH STITCH WIDTH NEEDLE POSITION SELECTOR PRESSER FOOT NEEDLE OTHERS PRESSURE ADJUSTER IFig. A Fig. BI I Fig. C Fig. D (No ) 2 Set at any setting. This dial is used to control distance between holes in button. L or R Button Sewing Foot Single Darning Plate Middle 1. Place darning plate on needle plate. 2. Place button between the presser foot and the material, making sure that holes of button fall in line with the base line of button sewing foot. 3. Set stitch width control to regulate distance of stitch between the holes in the button. Lower presser foot and check to see that needle enters holes in button properly. 4. At slow speed sew approximately 10 stitches. 5. Remove from machine. Cut upper and lower threads and with normal sewing needle sew threads through to back of button and tie. BUTTON FITTING WITH THREAD SHANK For heavier material use the following method to sew on buttons: 1. Place a needle on the button as shown in illustra- tion and then sew on button as you would regularly (see above). 2. When removing work from machine leave a long upper thread to be used to form a thread shank. 3. Pull the upper thread through hole of, button, between button and material, to form thread shank. Wind this thread around stitching which will make button very secure. 4. With normal sewing needle sew in thread ends. - 32 -
-
 1
1 -
2
-
3
-
4
-
5
-
6
-
7
-
8
-
9
-
10
-
11
-
12
-
13
-
14
-
15
-
16
-
17
-
18
-
19
-
20
-
21
-
22
-
23
-
24
-
25
-
26
-
27
-
28
-
 29
29 -
 30
30 -
 31
31 -
 32
32 -
 33
33 -
 34
34 -
 35
35 -
 36
36 -
 37
37 -
 38
38 -
 39
39 -
40
-
41
-
42
-
43
-
44
-
45
-
46
-
47
 |
 |
