Bushnell 11 8200 User Manual - Page 6
Taking A Picture
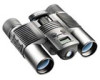 |
View all Bushnell 11 8200 manuals
Add to My Manuals
Save this manual to your list of manuals |
Page 6 highlights
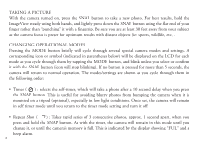
TAKING A PICTURE With the camera turned on, press the SNAP button to take a new photo. For best results, hold the ImageView steady using both hands, and lightly press down the SNAP button using the flat end of your finger rather than "punching" it with a fingertip. Be sure you are at least 30 feet away from your subject as the camera focus is preset for optimum results with distant objects (ie: sports, wildlife, etc.). CHANGING OPERATIONAL MODES Pressing the MODE button briefly will cycle through several special camera modes and settings. A corresponding icon or symbol (indicated in parentheses below) will be displayed on the LCD for each mode as you cycle through them by tapping the MODE button, and blink unless you select or confirm it with the SNAP button (icon will stop blinking). If no button is pressed for more than 5 seconds, the camera will return to normal operation. The modes/settings are shown as you cycle through them in the following order: • Timer ( ) : selects the self-timer, which will take a photo after a 10 second delay when you press the SNAP button. This is useful for avoiding blurry photos from bumping the camera when it is mounted on a tripod (optional), especially in low light conditions. Once set, the camera will remain in self timer mode until you return to the timer mode setting and turn it off. • Repeat Shot ( ) : Takes rapid series of 3 consecutive photos, approx. 1 second apart, when you press and hold the SNAP button. As with the timer, the camera will remain in this mode until you change it, or until the camera's memory is full. This is indicated by the display showing "FUL" and a beep alarm. 2
-
 1
1 -
 2
2 -
 3
3 -
 4
4 -
 5
5 -
 6
6 -
 7
7 -
 8
8 -
 9
9 -
 10
10 -
 11
11 -
 12
12 -
13
-
14
-
15
-
16
-
17
 |
 |