Canon 8120A001 PowerShot G3 Camera User Guide - Page 158
Selecting Images for Transferring
 |
UPC - 013803019742
View all Canon 8120A001 manuals
Add to My Manuals
Save this manual to your list of manuals |
Page 158 highlights
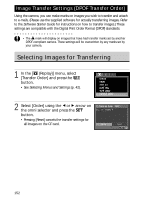
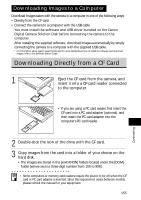
Image Transfer Settings (DPOF Transfer Order) Using the camera, you can make marks on images you wish to transfer and attach to e-mails. (Please use the supplied software for actually transferring images. Refer to the Software Starter Guide for instructions on how to transfer images.) These settings are compatible with the Digital Print Order Format (DPOF) standards. • The mark will display on images that have had transfer marks set by another DPOF-compliant camera. These settings will be overwritten by any marks set by your camera. Selecting Images for Transferring 1 In the [ (Replay)] menu, select [Transfer Order] and press the button. • See Selecting Menus and Settings (p. 42). 2 Select [Order] using the B or A arrow on the omni selector and press the button. • Pressing [Reset] cancels the transfer settings for all images on the CF card. 152
-
 1
1 -
2
-
3
-
4
-
5
-
6
-
7
-
8
-
9
-
10
-
11
-
12
-
13
-
14
-
15
-
16
-
17
-
18
-
19
-
20
-
21
-
22
-
23
-
24
-
25
-
26
-
27
-
28
-
29
-
30
-
31
-
32
-
33
-
34
-
35
-
36
-
37
-
38
-
39
-
40
-
41
-
42
-
43
-
44
-
45
-
46
-
47
-
48
-
49
-
50
-
51
-
52
-
53
-
54
-
55
-
56
-
57
-
58
-
59
-
60
-
61
-
62
-
63
-
64
-
65
-
66
-
67
-
68
-
69
-
70
-
71
-
72
-
73
-
74
-
75
-
76
-
77
-
78
-
79
-
80
-
81
-
82
-
83
-
84
-
85
-
86
-
87
-
88
-
89
-
90
-
91
-
92
-
93
-
94
-
95
-
96
-
97
-
98
-
99
-
100
-
101
-
102
-
103
-
104
-
105
-
106
-
107
-
108
-
109
-
110
-
111
-
112
-
113
-
114
-
115
-
116
-
117
-
118
-
119
-
120
-
121
-
122
-
123
-
124
-
125
-
126
-
127
-
128
-
129
-
130
-
131
-
132
-
133
-
134
-
135
-
136
-
137
-
138
-
139
-
140
-
141
-
142
-
143
-
144
-
145
-
146
-
147
-
148
-
149
-
150
-
151
-
152
-
 153
153 -
 154
154 -
 155
155 -
 156
156 -
 157
157 -
 158
158 -
 159
159 -
 160
160 -
 161
161 -
 162
162 -
 163
163 -
164
-
165
-
166
-
167
-
168
-
169
-
170
-
171
-
172
-
173
-
174
-
175
-
176
-
177
-
178
-
179
-
180
-
181
-
182
-
183
-
184
-
185
-
186
-
187
-
188
-
189
-
190
-
191
-
192
-
193
-
194
-
195
-
196
-
197
-
198
-
199
-
200
-
201
-
202
-
203
-
204
-
205
-
206
-
207
-
208
-
209
-
210
-
211
-
212
 |
 |
