Canon 8582A001 i80 Quick Start Guide - Page 20
Performing Infrared Communication
 |
UPC - 013803026627
View all Canon 8582A001 manuals
Add to My Manuals
Save this manual to your list of manuals |
Page 20 highlights
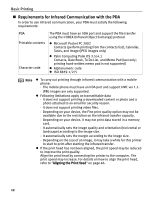
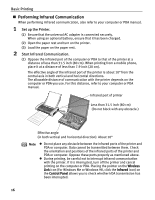
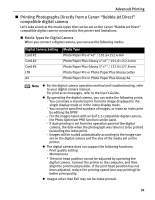
Basic Printing „ Performing Infrared Communication When performing infrared communication, also refer to your computer or PDA manual. 1 Set up the Printer. (1) Ensure that the universal AC adapter is connected securely. When using an optional battery, ensure that it has been charged. (2) Open the paper rest and turn on the printer. (3) Load the paper on the paper rest. 2 Start Infrared Communication. (1) Oppose the infrared port of the computer or PDA to that of the printer at a distance of less than 31.5 inch (80 cm). When printing from a mobile phone, place it at a distance of less than 7.9 inch (20 cm). The effective angle of the infrared port of the printer is about 10° from the central axis in both vertical and horizontal directions. The allowable distance of communication with the printer depends on the computer or PDA you use. For this distance, refer to your computer or PDA manual. Infrared port of printer Less than 31.5 inch (80 cm) (Do not block with any obstacle.) Effective angle (in both vertical and horizontal direction): About 10° Note z Do not place any obstacle between the infrared ports of the printer and PDA or computer. Data cannot be transmitted between them. Check the orientation and positions of the infrared ports of the printer and PDA or computer. Oppose these ports properly as mentioned above. z During printing, be careful not to interrupt infrared communication with the printer. If it is interrupted, turn off the printer and cancel printing on the computer or PDA. Placing the pointer on the Wireless Link icon (For Windows Me or Windows 98, click the Infrared icon) on the Control Panel allows you to check whether IrDA transmission has been interrupted. 16
-
 1
1 -
2
-
3
-
4
-
5
-
6
-
7
-
8
-
9
-
10
-
11
-
12
-
13
-
14
-
 15
15 -
 16
16 -
 17
17 -
 18
18 -
 19
19 -
 20
20 -
 21
21 -
 22
22 -
 23
23 -
 24
24 -
 25
25 -
26
-
27
-
28
-
29
-
30
-
31
-
32
-
33
-
34
-
35
-
36
-
37
-
38
-
39
-
40
-
41
-
42
-
43
-
44
-
45
-
46
-
47
-
48
-
49
-
50
-
51
-
52
-
53
-
54
-
55
-
56
-
57
-
58
-
59
-
60
-
61
-
62
-
63
-
64
-
65
-
66
-
67
-
68
-
69
-
70
-
71
-
72
-
73
-
74
-
75
-
76
-
77
-
78
-
79
-
80
-
81
-
82
-
83
-
84
 |
 |
