Canon 8582A001 i80 Quick Start Guide - Page 24
About Paper Size and Paper Type, About Layout and Trimming, About Image optimize, About Date
 |
UPC - 013803026627
View all Canon 8582A001 manuals
Add to My Manuals
Save this manual to your list of manuals |
Page 24 highlights
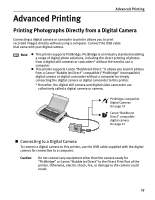
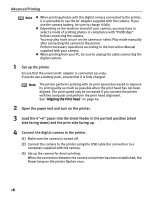
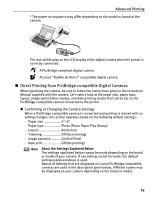
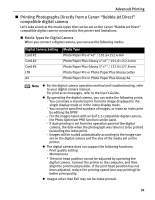
Advanced Printing „ About "Paper Size" and "Paper Type" To change the paper size or paper type, operate the camera to select the PictBridge print setup mode and confirm or change the settings. By default, 4"×6" is selected in "Paper Size" and "Photo "(Photo Paper Plus Glossy) is selected in "Paper Type" for this printer. To use Photo Paper Pro, select "Fast Photo" in "Paper type". If using a Canon PictBridge-compatible camera, you can select 5"×7" in "Paper Size". The following sizes and types of paper can be loaded in the printer by selecting options in "Paper Size" and "Paper Type". "Paper Size" setting Paper Type" setting Paper loaded in printer 4"×6" (Default) Photo (Default) Photo Paper Plus Glossy Fast Photo Photo Paper Pro 8.5"×11" (Letter) Photo Photo Paper Plus Glossy Fast Photo Photo Paper Pro 5"×7" * Photo Photo Paper Plus Glossy * This size can be selected only for Canon PictBridge-compatible cameras. (Note that it cannot be selected for some models.) „ About "Layout" and "Trimming" By default, "Borderless" is selected in "Layout" and "Off (No trimming)" is selected in "Trimming" for this printer. „ About "Image optimize" By default, "On (Exif Print)" is selected for this printer. „ About "Date print" By default, "Off" is selected for this printer. "Date Print" depends on the settings using the controls of the camera. Note z This printer can handle only Exif/JPEG image data to produce photos using PictBridge. z Never disconnect the USB cable during printing. z When disconnecting the USB cable between the digital camera and printer, follow the instructions given in the Instruction Manual of Camera. z Controls of the digital camera cannot be used for the following: - Print quality setting - Printer maintenance 20
-
 1
1 -
2
-
3
-
4
-
5
-
6
-
7
-
8
-
9
-
10
-
11
-
12
-
13
-
14
-
15
-
16
-
17
-
18
-
 19
19 -
 20
20 -
 21
21 -
 22
22 -
 23
23 -
 24
24 -
 25
25 -
 26
26 -
 27
27 -
 28
28 -
 29
29 -
30
-
31
-
32
-
33
-
34
-
35
-
36
-
37
-
38
-
39
-
40
-
41
-
42
-
43
-
44
-
45
-
46
-
47
-
48
-
49
-
50
-
51
-
52
-
53
-
54
-
55
-
56
-
57
-
58
-
59
-
60
-
61
-
62
-
63
-
64
-
65
-
66
-
67
-
68
-
69
-
70
-
71
-
72
-
73
-
74
-
75
-
76
-
77
-
78
-
79
-
80
-
81
-
82
-
83
-
84
 |
 |
