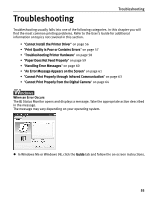
Canon 8582A001 i80 Quick Start Guide - Page 61
Print Quality is Poor or Contains Errors
 |
UPC - 013803026627
View all Canon 8582A001 manuals
Add to My Manuals
Save this manual to your list of manuals |
Page 61 highlights
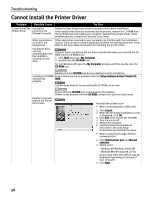
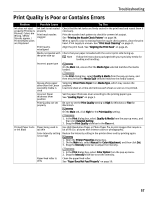
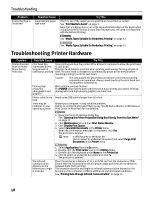
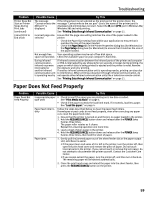
Troubleshooting Print Quality is Poor or Contains Errors Problem Possible Cause Try This Ink does not eject properly/Printing is Blurred/ Colors are Wrong / White Streaks appear / Printed Ruled Lines are Displaced Ink tank is not seated properly Print head nozzles clogged Check that the ink tanks are firmly seated in the print head and reseat them if necessary. Print the nozzle check pattern to check for uneven ink output. See "Printing the Nozzle Check Pattern" on page 38. When a specific color is missing from the nozzle check pattern, clean the print head. If ink supply is uneven: See "Print Head Cleaning" on page 41. Print head is misaligned Align the print head. See "Aligning the Print Head" on page 46. Media not loaded with Check that your paper is loaded with the correct print side facing up. the print-side up Note Follow the instructions packaged with your speciality media for loading and handling. Incorrect paper type On the Main tab, ensure that the Media Type selected matches the media loaded. Glossy photo paper other than the Canon speciality media is used Incorrect Paper thickness lever position Print Quality not set properly In the Print dialog box, select Quality & Media from the pop-up menu, and then ensure that the Media Type selected matches the media loaded. Selecting Other Photo Paper from Media Type, which may resolve the problem. Load one sheet at a time and remove each sheet as soon as it is printed. Set the paper thickness lever according to the printing paper type. See "Loading Paper" on page 3. Be sure to set the Print Quality setting to High for Windows or Fine for Macintosh. On the Main tab, click High for the Print Quality setting. 1. In the Print dialog box, select Quality & Media from the pop-up menu, and then click Detailed Setting. 2. Drag the Print Quality slide bar to the Fine end. Printed Paper Curls Paper being used is Use High Resolution Paper or Photo Paper Pro to print images that require a or Ink Blots too thin lot of ink (i.e. pictures with intense colors or photographs). Color Intensity setting Reduce the Intensity setting in the printer driver and try printing again. is too high 1. Open the Printer Properties dialog box. 2. On the Main tab, select Manual for Color Adjustment, and then click Set. 3. Drag the Intensity slide bar to adjust the intensity. Paper feed roller is dirty 1. In the Print dialog box, select Color Option from the pop-up menu. 2. Drag the Intensity slide bar to set the intensity. Clean the paper feed roller. See "Paper Does Not Feed Properly" on page 59. 57
-
 1
1 -
2
-
3
-
4
-
5
-
6
-
7
-
8
-
9
-
10
-
11
-
12
-
13
-
14
-
15
-
16
-
17
-
18
-
19
-
20
-
21
-
22
-
23
-
24
-
25
-
26
-
27
-
28
-
29
-
30
-
31
-
32
-
33
-
34
-
35
-
36
-
37
-
38
-
39
-
40
-
41
-
42
-
43
-
44
-
45
-
46
-
47
-
48
-
49
-
50
-
51
-
52
-
53
-
54
-
55
-
 56
56 -
 57
57 -
 58
58 -
 59
59 -
 60
60 -
 61
61 -
 62
62 -
 63
63 -
 64
64 -
 65
65 -
 66
66 -
67
-
68
-
69
-
70
-
71
-
72
-
73
-
74
-
75
-
76
-
77
-
78
-
79
-
80
-
81
-
82
-
83
-
84
 |
 |
