Canon Canon CX-G6400 4 Inkjet Card Printer CX-G6400 Getting Started Guide - Page 14
Printer Part Names and Functions, Front/Right Side View
 |
View all Canon Canon CX-G6400 4 Inkjet Card Printer manuals
Add to My Manuals
Save this manual to your list of manuals |
Page 14 highlights
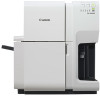
Printer Part Names and Functions Front/Right Side View [1] [9] [8] [2] [3] [4] [5] [6] [7] ʦ1ʧ Operation panelʢˠ P.14ʣ Keys necessary for operation and lamps to indicate the state of printer are provided on this panel. ʦ2ʧ USB port Connect a USB cable here to connect to the computer. ʦ3ʧ LAN port Connect a LAN cable here to connect to the computer. ʦ4ʧ Side guideʢˠ P.32ʣ Adjust the position of this guide according to the paper width. ʦ5ʧ Power socket Connect the power cord here. ʦ6ʧ Feeder lift trayʢˠ P.32ʣ Load the paper. ʦ7ʧ Tray switch lever Use in the "1 (Standard)" position. Normally, this does not need to be changed. If paper cannot be fed properly, switch the lever position. ʦ8ʧ Ink tank door Open this door when replacing ink tanks or opening the upper unit. ʦ9ʧ Upper unit Open this unit when loading paper, removing paper jammed in the paper feed path, or cleaning inside of the machine. The upper unit holds the printhead. 11
-
 1
1 -
2
-
3
-
4
-
5
-
6
-
7
-
8
-
 9
9 -
 10
10 -
 11
11 -
 12
12 -
 13
13 -
 14
14 -
 15
15 -
 16
16 -
 17
17 -
 18
18 -
 19
19 -
20
-
21
-
22
-
23
-
24
-
25
-
26
-
27
-
28
-
29
-
30
-
31
-
32
-
33
-
34
-
35
-
36
-
37
-
38
-
39
-
40
-
41
-
42
-
43
-
44
-
45
-
46
-
47
 |
 |
