Canon DC330 DC330 Instruction Manual - Page 68
Connecting to a Computer, PC Connection Diagram - user manual
 |
UPC - 013803091687
View all Canon DC330 manuals
Add to My Manuals
Save this manual to your list of manuals |
Page 68 highlights
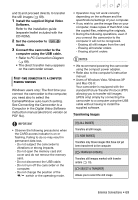
Connecting to a Computer Connecting to a Computer USB Terminal Open the LCD panel to access. Note: Do not use the camcorder as an external drive when using a computer to create discs. PC Connection Diagram Terminal on the camcorder Connecting cable Terminal on the connected device 1 Output connection (signal flow ) to a computer or PictBridge-compatible printer with a USB port. USB cable (supplied) Corel Application Disc - Movie Playback/Editing and Various Disc Operations The supplied CD-ROM Corel Application Disc includes software that will allow you to play back movies, transfer movies to a computer and easily edit them, make copies of your disc or create (author) new personalized discs, and more. For further details, refer to the Corel Application Disc Installation Guide and User Manual. Transferring Photos - Direct Transfer With the supplied USB cable and software (on the DIGITAL VIDEO Solution Disk CD-ROM) you can transfer still images to a computer. Preparations Install the software before you connect the camcorder to the computer for the first time. (Windows users only: you also need to select CameraWindow's autolaunch setting.) After that, just connect the camcorder to the computer (steps 2 68 • External Connections
-
 1
1 -
2
-
3
-
4
-
5
-
6
-
7
-
8
-
9
-
10
-
11
-
12
-
13
-
14
-
15
-
16
-
17
-
18
-
19
-
20
-
21
-
22
-
23
-
24
-
25
-
26
-
27
-
28
-
29
-
30
-
31
-
32
-
33
-
34
-
35
-
36
-
37
-
38
-
39
-
40
-
41
-
42
-
43
-
44
-
45
-
46
-
47
-
48
-
49
-
50
-
51
-
52
-
53
-
54
-
55
-
56
-
57
-
58
-
59
-
60
-
61
-
62
-
 63
63 -
 64
64 -
 65
65 -
 66
66 -
 67
67 -
 68
68 -
 69
69 -
 70
70 -
 71
71 -
 72
72 -
 73
73 -
74
-
75
-
76
-
77
-
78
-
79
-
80
-
81
-
82
-
83
-
84
-
85
-
86
-
87
-
88
-
89
-
90
-
91
-
92
-
93
-
94
-
95
-
96
-
97
-
98
-
99
-
100
-
101
-
102
-
103
 |
 |
