Canon DR-4010C Reference Guide - Page 17
Back View, Interfaces, CAUTION, Document Eject Tray 2
 |
UPC - 013803065664
View all Canon DR-4010C manuals
Add to My Manuals
Save this manual to your list of manuals |
Page 17 highlights
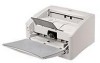
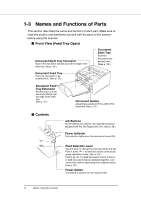
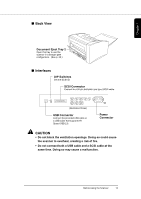
Chapter 1 ■ Back View Document Eject Tray 2 Open this tray to use the scanner in a straight path configuration. (See p. 20.) ■ Interfaces DIP Switches Set the SCSI ID. SCSI Connector Connect to a 50-pin half-pitch (pin type) SCSI cable. ON 2 1 (Ventilation Holes) USB Connector Connect the provided USB cable or a USB cable that supports HiSpeed USB 2.0. Power Connector CAUTION • Do not block the ventilation openings. Doing so could cause the scanner to overheat, creating a risk of fire. • Do not connect both a USB cable and a SCSI cable at the same time. Doing so may cause a malfunction. Before Using the Scanner 13
-
 1
1 -
2
-
3
-
4
-
5
-
6
-
7
-
8
-
9
-
10
-
11
-
 12
12 -
 13
13 -
 14
14 -
 15
15 -
 16
16 -
 17
17 -
 18
18 -
 19
19 -
 20
20 -
 21
21 -
 22
22 -
23
-
24
-
25
-
26
-
27
-
28
-
29
-
30
-
31
-
32
-
33
-
34
-
35
-
36
-
37
-
38
-
39
-
40
-
41
-
42
-
43
-
44
-
45
-
46
-
47
-
48
-
49
-
50
-
51
-
52
-
53
-
54
-
55
-
56
-
57
-
58
 |
 |

Before Using the Scanner
13
Chapter 1
■
Back View
■
Interfaces
CAUTION
•
Do not block the ventilation openings. Doing so could cause
the scanner to overheat, creating a risk of fire.
•
Do not connect both a USB cable and a SCSI cable at the
same time. Doing so may cause a malfunction.
Document Eject Tray 2
Open this tray to use the
scanner in a straight path
configuration.
(See p. 20.)
1
ON
2
USB Connector
Connect the provided USB cable or
a USB cable that supports Hi-
Speed USB 2.0.
DIP Switches
Set the SCSI ID.
SCSI Connector
Connect to a 50-pin half-pitch (pin type) SCSI cable.
(Ventilation Holes)
Power
Connector