Canon LV-7225 /app/pdf/projector/lv5220-7220-7225_manual.pdf - Page 11
Remote Control Unit, RESET/ON/ALL-OFF switch
 |
UPC - 013803046021
View all Canon LV-7225 manuals
Add to My Manuals
Save this manual to your list of manuals |
Page 11 highlights
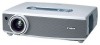
Remote Control Unit q w e r !5 t !6 y u i o !7 !0 !8 !1 !2 !9 !3 @0 @1 !4 @2 Part Names and Functions q L-CLICK button Acts as left click for wireless mouse operation. (p13) w SIGNAL EMISSION indicator This indicator lights red while the laser beam is being emitted from the laser light window or a signal is being sent from the remote control unit to the projector. e KEYSTONE button Corrects keystone distortion. (p25, 42) r AUTO PC button Operates the Auto PC adjustment function. (p29) t AUTO SET button Corrects vertical keystone distortion and adjusts PC display parameters. (p24, 42) y COMPUTER button Selects input source (COMPUTER 1 or COMPUTER 2). (p27) u POINT (ed7 8) button Selects an item or adjusts value in the On-Screen Menu. These are also used to pan the image in the Digital zoom +/- mode. (p34) Point 7 8 button are also used as VOL+/- buttons. (p26) i PRESENTATION POINTER button Move a pointer of the projector or a pointer for wireless mouse operation. (p12) o SET button Executes the item selected, or to expand or compress image in the Digital zoom +/mode. (p34) !0 PAGE UP/DOWN button Turns pages; the Up button to the previous page and the Down button to the next page for an image from a computer. Connect the projector and your computer with a USB cable before use. (See page 17.) !1 LASER button Operates the Laser pointer function. Laser beam is emitted while pressing this button within 1 minute. When using this laser pointer for more than 1 minute, release the LASER button and press it again. This button is also used as a switching button to activate the Pointer function of the projector. (p12,13) !2 FREEZE button Freezes the projected picture. (p25) !3 IMAGE button Selects image levels.(p32, 38) !4 MUTE button Mutes sound. (p26) !5 POWER button Turns the projector on or off. (p20, 21) !6 VIDEO button Selects input source (VIDEO). (p35) !7 MENU button Opens or closes the On-Screen Menu. (p22) !8 D.ZOOM button Selects the Digital zoom +/- mode and resize the image. (p34) !9 NO SHOW button Turns the picture into black image. (p25) @0 R-CLICK button Acts as right click for wireless mouse operation. (p13) @1 P-TIMER button Operates P-Timer function. (p26) @2 RESET/ON/ALL-OFF switch When using the remote control unit, set this switch to "ON." Set it to "ALL OFF" for power saving when it is not used. Slide this switch to "RESET" to initialize the remote control code or switch Spotlight and Pointer back to Laser pointer. (p12, 14) 11 Part Names and Functions
-
 1
1 -
2
-
3
-
4
-
5
-
 6
6 -
 7
7 -
 8
8 -
 9
9 -
 10
10 -
 11
11 -
 12
12 -
 13
13 -
 14
14 -
 15
15 -
 16
16 -
17
-
18
-
19
-
20
-
21
-
22
-
23
-
24
-
25
-
26
-
27
-
28
-
29
-
30
-
31
-
32
-
33
-
34
-
35
-
36
-
37
-
38
-
39
-
40
-
41
-
42
-
43
-
44
-
45
-
46
-
47
-
48
-
49
-
50
-
51
-
52
-
53
-
54
-
55
-
56
-
57
-
58
-
59
-
60
-
61
-
62
-
63
-
64
 |
 |
