Canon LV-S4 Owners Manual - Page 9
Rear Terminal, Audio In Stereo, Monitor Out, Computer / S-video / Component In, Audio Outvariable
 |
View all Canon LV-S4 manuals
Add to My Manuals
Save this manual to your list of manuals |
Page 9 highlights
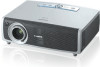
Part Names and Functions Rear Terminal Part Names and Functions q w e r VIDEO AUDIO IN AUDIO OUT SERVICE PORT (VARIABLE) COMPUTER/ S-VIDEO/ RESET COMPONENT IN MONITOR OUT y t q VIDEO Connect the composite video output from video equipment to VIDEO jack. (p16) w AUDIO IN (Stereo) Connect the audio output from computer or video equipment connected to q or y to this jack. (p15, 16) e AUDIO OUT(VARIABLE) Connect an external audio amplifier to this jack. (p15, 16) This terminal outputs sound from AUDIO IN terminal. t MONITOR OUT This terminal outputs the signal coming from COMPUTER / S-VIDEO / COMPONENT IN terminal. (This terminal cannot output RGB(Scart) signal from COMPUTER / S-VIDEO / COMPONENT IN terminal.) (p15) y COMPUTER / S-VIDEO / COMPONENT IN Connect S-video output, RGB Scart 21-pin video output, component video output or computer output to this connector. (p15,16) r SERVICE PORT This jack is used to service this projector. ✽ A built-in micro processor which controls this unit may occasionally malfunction and need to be reset. This can be done by pressing the RESET button with a pen, which will shut down and restart the unit. Do not use the RESET function excessively. ✔Note: • Audio out and Monitor out terminal works only when the projector is under operation and do not work when the projector is in stand-by state or Power management mode (p41). 9
-
 1
1 -
2
-
3
-
 4
4 -
 5
5 -
 6
6 -
 7
7 -
 8
8 -
 9
9 -
 10
10 -
 11
11 -
 12
12 -
 13
13 -
 14
14 -
15
-
16
-
17
-
18
-
19
-
20
-
21
-
22
-
23
-
24
-
25
-
26
-
27
-
28
-
29
-
30
-
31
-
32
-
33
-
34
-
35
-
36
-
37
-
38
-
39
-
40
-
41
-
42
-
43
-
44
-
45
-
46
-
47
-
48
-
49
-
50
-
51
-
52
-
53
-
54
-
55
-
56
-
57
-
58
-
59
-
60
 |
 |
