Canon MX7600 Quick Start Guide - Page 12
One-Touch Speed Dial buttons, FAX Quality button - reset
 |
UPC - 013803087895
View all Canon MX7600 manuals
Add to My Manuals
Save this manual to your list of manuals |
Page 12 highlights
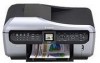
(12) Redial/Pause button Redials the last number called using the Numeric buttons. Also enters pauses between or after numbers when dialing or registering numbers. (13) Coded Dial button Press this button and a two-digit code to display a pre-registered fax/telephone number or group. (14) Stop/Reset button Cancels operations such as copying, scanning, or faxing, or a print job in progress. (15) Black button (top) / Color button (bottom) Press the Black button to start black & white copying, scanning, or faxing. Press the Color button to start color copying, photo printing, scanning, or faxing. (16) Hook button Connects or disconnects the telephone line. (17) Tone button Switches temporarily to tone dialing. Also changes the input mode when entering characters. (18) Trimming button Specifies the cropping area of the displayed photo. (19) { } [ ] buttons Scrolls through menu selections and increases/decreases setting values, such as the number of copies. You can use these buttons when {, }, [, and ] are displayed on the LCD. Also, the [ button cancels the entered character, and the ] button enters a space between characters when entering characters. (20) OK button Finalizes your selection for the menu or setting item. This button is also used to dismiss the error message and resume the machine's normal operation after resolving a printing error or removing jammed paper, or to eject documents remaining in the ADF. (21) Back button Cancels operations and returns the LCD to the previous screen. (22) FAX Quality button Sets the scan contrast and resolution of the fax you are sending. (23) Search button Searches for photos on the memory card with the specified shooting date. (24) Enlarge/Reduce button Specifies the enlargement or reduction ratio for copying. (25) Two-Sided button Specifies the settings for duplex copying. (26) One-Touch Speed Dial buttons Press these buttons to display pre-registered fax/telephone numbers or groups. 8 Before Using the Machine
-
 1
1 -
2
-
3
-
4
-
5
-
6
-
 7
7 -
 8
8 -
 9
9 -
 10
10 -
 11
11 -
 12
12 -
 13
13 -
 14
14 -
 15
15 -
 16
16 -
 17
17 -
18
-
19
-
20
-
21
-
22
-
23
-
24
-
25
-
26
-
27
-
28
-
29
-
30
-
31
-
32
-
33
-
34
-
35
-
36
-
37
-
38
-
39
-
40
-
41
-
42
-
43
-
44
-
45
-
46
-
47
-
48
-
49
-
50
-
51
-
52
-
53
-
54
-
55
-
56
-
57
-
58
-
59
-
60
-
61
-
62
-
63
-
64
-
65
-
66
-
67
-
68
-
69
-
70
-
71
-
72
-
73
-
74
-
75
-
76
-
77
-
78
-
79
-
80
-
81
-
82
-
83
-
84
-
85
-
86
-
87
-
88
-
89
-
90
-
91
-
92
-
93
-
94
-
95
-
96
-
97
-
98
-
99
-
100
-
101
-
102
-
103
-
104
-
105
-
106
-
107
-
108
-
109
-
110
-
111
-
112
-
113
-
114
-
115
-
116
-
117
-
118
-
119
-
120
-
121
-
122
-
123
-
124
-
125
-
126
-
127
-
128
-
129
-
130
-
131
-
132
-
133
-
134
-
135
-
136
-
137
-
138
-
139
-
140
-
141
-
142
-
143
-
144
-
145
-
146
-
147
-
148
-
149
-
150
-
151
-
152
-
153
-
154
-
155
-
156
-
157
-
158
-
159
-
160
-
161
-
162
-
163
-
164
-
165
-
166
-
167
-
168
-
169
-
170
-
171
-
172
-
173
-
174
-
175
-
176
-
177
-
178
-
179
-
180
-
181
-
182
-
183
-
184
-
185
-
186
-
187
-
188
-
189
-
190
-
191
-
192
 |
 |
