Canon MultiPASS MP390 MultiPASS MP390 Set-Up Sheet - Page 3
Install the print head., Connect the power cord.
 |
View all Canon MultiPASS MP390 manuals
Add to My Manuals
Save this manual to your list of manuals |
Page 3 highlights
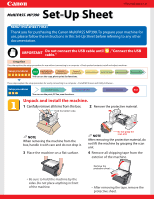
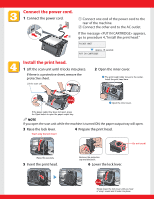
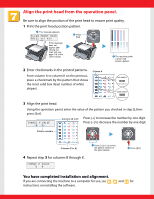
Connect the power cord. 1 Connect the power cord. 2 1 q Connect one end of the power cord to the rear of the machine. w Connect the other end to the AC outlet. If the message appears, go to procedure 4, "Install the print head." Approx. 15 seconds Install the print head. 1 Lift the scan unit until it locks into place. If there is a protective sheet, remove the protective sheet. Lift the scan unit. 2 Open the inner cover. w The print head holder moves to the center. Install the print head here. Click q Open the inner cover. If the paper output tray does not open, press the Open button to open the paper output tray. NOTE If you open the scan unit while the machine is turned ON, the paper output tray will open. 3 Raise the lock lever. 4 Prepare the print head. Touch only the lock lever! Do not touch! Raise this securely. 5 Insert the print head. Remove the protective cap and discard it. 6 Lower the lock lever. Snap Slowly lower the lock lever until you hear a "snap" sound and it locks into place.
-
 1
1 -
 2
2 -
 3
3 -
 4
4 -
 5
5 -
 6
6 -
 7
7 -
 8
8
 |
 |
