Canon PIXMA MG5420 Setup Guide - Page 21
The device may not be able to connect to the network in the following cases, To perform Advanced - wireless setup
 |
View all Canon PIXMA MG5420 manuals
Add to My Manuals
Save this manual to your list of manuals |
Page 21 highlights
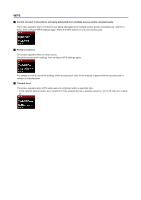
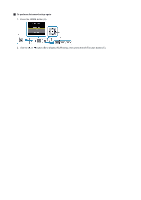
The device may not be able to connect to the network in the following cases: If the DHCP function of the access point is inactive, enable the DHCP function or specify the IP address (IPv4 only) of the printer and configure wireless connection settings again. In addition, make sure that the selected WEP key number and entered WEP key are correct. For details on how to check or change the settings of the access point, refer to the manual supplied with the access point or contact its manufacturer. To specify the IP address of the printer, follow the procedure below. 1. Display Setup in the HOME screen, then press the right Function button. 2. Select Device settings, then press the OK button. 3. Select LAN settings, then press the OK button. 4. Select Other setup, then press the OK button. 5. Select TCP/IP settings, then press the OK button. 6. Select IPv4, then press the OK button. 7. Select Yes, then press the OK button. 8. Select IP address, then press the OK button. 9. Select Manual setup, then press the OK button. Follow the on-screen instructions to proceed with settings. When the setup is complete, press the HOME button. To perform Advanced setup again 1. Press the HOME button (A). 2. Use the or button (B) to display WLAN setup, then press the left Function button (C).
-
 1
1 -
2
-
3
-
4
-
5
-
6
-
7
-
8
-
9
-
10
-
11
-
12
-
13
-
14
-
15
-
 16
16 -
 17
17 -
 18
18 -
 19
19 -
 20
20 -
 21
21 -
 22
22 -
 23
23
 |
 |